Getting data into Cloud Platform
To begin onboarding and working with data in Splunk Cloud Platform, review the following general steps.
- Decide on the objective you want to achieve using Splunk Cloud Platform.
- Identify the data you need in Splunk Cloud Platform to help you complete that objective.
- After you know the data source, find an add-on in Splunkbase to help you get the data into Splunk Cloud Platform (e.g. the Splunk Add-on for Microsoft Windows).
- Install the Splunk Cloud Platform credentials package to allow the forwarder to communicate with Splunk Cloud Platform securely.
- Use Splunk Lantern’s security, observability and platform use cases to discover new applications for your data.
If you have any questions regarding data onboarding, check out the Getting Data In section in our community or contact your CSM or CSA.
Learning the basics
Use these scripted learning paths to master the basics. You don't have to worry about anything going wrong because these paths use sample datasets, so you can get quickly up to speed.
Understanding getting data in processes
Review the following resources before onboarding your data.
- Awesome admins: Get Data In. Watch this Tech Talk to learn about getting data in from any Linux or Windows host, how to create lossless syslog ingress or TCP data ingress over any port from any custom application or use case, and using APIs to send or receive data.
- What data can I index? The Splunk platform can index any and all IT, streaming, machine, and historical data. To set this up, you would point Splunk at a data source, fill out information about that source, and then that source becomes a data input. Splunk indexes the data stream and transforms it into a series of events that you can view and search right away - no structuring necessary.
- Get started with Getting Data In. Use this documentation to guide your data onboarding process.
Onboarding your data
To help guide your data onboarding, check out Splunk's five-step process to build best-practice data onboarding workflows. These guidelines can help you streamline data requests, define the use case, validate data, and properly communicate the availability of new data.
Onboarding documentation for popular data sources:
Data Manager
Data Manager is the easiest way to get your AWS, Azure, or GCP data into Splunk. It drastically reduces the time to set up cloud data sources from hours to minutes. Data Manager is native to Splunk Cloud Platform and provides a centralized data ingestion management, monitoring and troubleshooting experience.
- Follow along with a step-by-step tutorial video
- Refer to the Data Manager documentation

Splunk Edge Processor
Splunk Edge Processor is the latest innovation in data preprocessing. It offers more efficient, flexible data transformation – helping you reduce noise, control costs, and gain visibility and control over your data in motion. It works at the edge of your network. You can use it to filter, mask, and transform your data close to its source before routing the processed data to the environment of your choice. Follow the Edge Processor Getting Started Guide to start transforming your data today.
Splunk Edge Processor combines Splunk-managed cloud services, on-premises data processing software, and SPL2 to support data processing at the edge of your network. It allows you to ingest data into Splunk, S3 or other systems. As a user, you can easily configure SPL2 based pipelines to filter, mask, transform and route data to destinations using the pipeline builder.
Splunk Edge Processor is included with your Splunk Cloud Platform, available at no additional cost. Learn more about the requirements to use Edge Processor and how to request access if you do not already have it.
Common use cases: Filter low-value or noisy data (for example, DEBUG logs), enrich and extract only the critical data, route different “slices” of data to Splunk platform and Amazon S3 for low-cost storage.
Ingest actions
Ingest actions is a new user interface that enables customers to quickly and easily configure data flows and control the volume, format and destination of data. It is accessible from the Splunk Enterprise and Splunk Cloud Platform Search and Reporting app as an option in the administrative drop down.
Use ingest actions to filter, mask, and route data at ingest and at the edge, using only simple clicks - no writing command lines or hand-writing stanzas in configuration files. This feature allows you to cut through the noise, detangling the data that's mission critical from that which needs to be archived.

The Ingest actions page can be found in Splunk Web under Settings > Data > Ingest actions. This feature allows you to dynamically preview and build rulesets using sample data. You simply click to add a new rule, specify what needs to be redacted, and the expression you want to mask it with.

Common use cases include instantly routing data to external S3-compliant destinations for archival or audit purposes, removing sensitive information (PII data, user names, etc.), removing IP addresses, filter DEBUG logs, and much more.
Forwarding your data
Universal forwarders are one of the many ways to collect data in Splunk Cloud Platform. They stream data from your machine to a data receiver, which is usually a Splunk index where you store your Splunk data. Universal forwarder streaming lets you monitor data in real time.
The universal forwarder also ensures that your data is correctly formatted before sending it to Splunk Cloud Platform. You can also manipulate your data before it reaches the indexes or manually add the data. See the following example diagram:
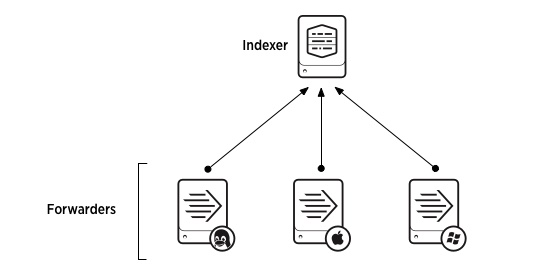
See Deploy the universal forwarder to create this configuration.
Benefits of the universal forwarder
Universal forwarders are highly scalable. Universal forwarders use significantly less hardware resources than other Splunk products. You can install thousands of them without impacting network performance and cost. The universal forwarder does not have a user interface, which helps minimize resource use.
Forwarders allow metadata tagging, including source, source type, and host. They also provide configurable buffering, data compression, SSL security, and the use of any available network ports.
To get started, download the universal forwarder, then review:
Archiving your data
Indexes store the data sent to your Splunk Cloud Platform deployment. You can create, update, delete, and view index properties, modify data retention settings for individual indexes, delete data from indexes, and optimize search performance by managing the number of indexes and the data sources stored in specific indexes. Storage is based on your subscription type. You can also purchase additional data retention capacity.
- Review Splunk Cloud Platform data policies and storage information for ingest-based subscriptions and for workload pricing subscriptions.
- Create a Splunk Cloud Platform index and manage data retention settings. Review how to manage Splunk Cloud Platform indexes and create a cloud index and set up data retention.
- Learn more about the importance of data retention. Review Splunk Cloud Platform service limits and constraints.
- Learn about DDAA and DDSS storage entitlements. Review the Storage section in the Splunk Cloud Platform service description.