Configuring Alert Actions with the Google Chrome Add On for Splunk
You are a SOC analyst whose employees interact with Google Chrome in two different ways - through a browser and through ChromeOS devices. You're concerned about several different types of risky behavior that impact enterprise resiliency, including:
| Risky browser behavior | Risky ChromeOS behavior |
|---|---|
|
|
You want to be able to automatically take action against any risky behavior by creating alerts with alert actions. Whether you're looking at instances of risky browser or ChromeOS behavior, you want to be able to bring Chrome Threat and Data Protection events into the Splunk platform and map them to the Splunk Common Information Model (CIM) to allow for easy correlation with other data sources and maximum efficiency at search time. Other actions you want to accomplish:
| Browser actions | ChromeOS actions |
|---|---|
|
|
How to use Splunk software for this use case
The Google Chrome Solution for Splunk features alert actions that enhance the security posture of your organization. Users can set up any kind of alert to get notified of unusual behavior. The solution equips them with tools to immediately remediate and minimize the risk.
You'll use the Google Chrome App for Splunk to detect risky browser-based behaviour, and the Google ChromeOS App for Splunk to detect risky ChromeOS behavior. You can jump to the instructions below to detect risky browser behavior or detect risky ChromeOS behavior.
Prerequisites
- Splunk platform version 9.0 or 9.1 and above
- Chrome Browser Cloud Management
- Google Chrome Add On for Splunk
- Google ChromeOS App for Splunk
To learn more about alerts, read Getting started with alerts.
Detecting risky browser behavior with the Google Chrome App for Splunk
Move an organizational unit
Administrators in Google can use organizational units to manage devices and policies. Making use of this feature can help mitigate security risks.
- To create a new alert to monitor unsafe site visit events, navigate to Settings > Searches, Reports, and Alerts, then click New Alert.
- Configure the alert to search for events with eventtype=”unsafe_site_visit”, and set to run on the desired schedule.

- In the Trigger Actions section, click Add Actions and add a custom trigger: "Google Chrome - Move to OU".
- Configure the scope to target the desired object: either the user, the managed browser, or both.
It is recommended to keep this setting at default (both) and use single type scope only within justified use cases.
- Select the service account that will be used to call the Chrome API.

- Select the target Organizational Unit Path.
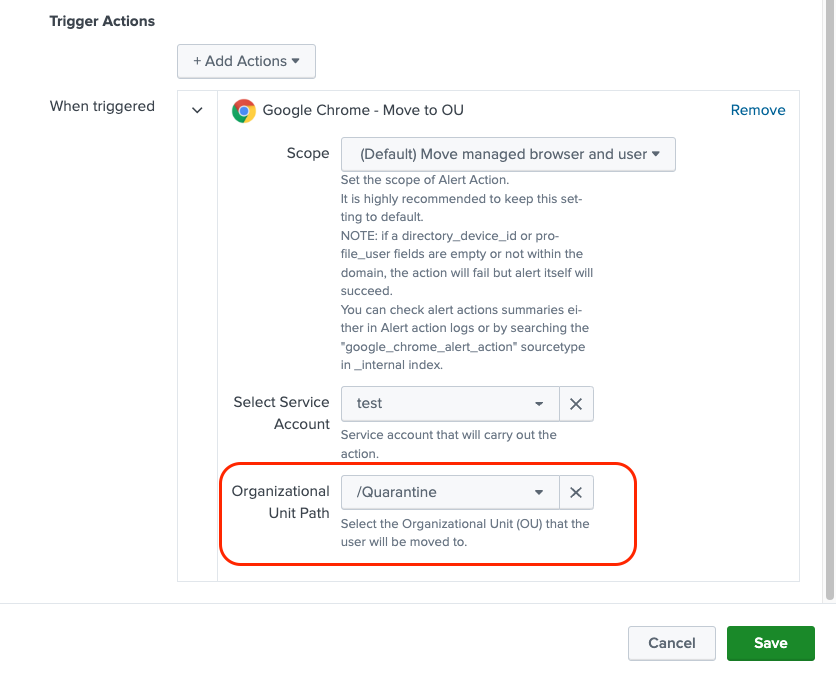
Now when an unsafe site visit event occurs, the user or device will be automatically quarantined in the account purgatory organizational unit so that the security risk is reduced.
Block an extension
The Chrome Browser Cloud Management (CBCM) console allows administrators to block extensions. To learn more about this feature, see Allow or block apps and extensions in the Google documentation.
- To create a new alert to monitor extension install events, navigate to Settings > Searches, Reports, and Alerts, then click New Alert.
- Configure the alert to search for events with eventtype=”extension_install”, and use the chrome extension risk summary lookup to search for the highest risk permission that the extension requests.

- Set the alert to run on the desired schedule.
- In the Trigger Actions section, click Add Actions and add the custom trigger action “Google Chrome - Block Extension”.
- Select the service account that will be used to call the Chrome API.
- Select target Organizational Unit Path where the extension will be blocked.
Always take into consideration the inheritance of policies through a parent unit and its children.
Now any extension that is installed with a high risk permission will be automatically blocked for all users and devices within the chosen organizational unit.
Detecting risky ChromeOS behavior with the Google ChromeOS App for Splunk
For more information on working with alert actions including detailed process steps, see Using custom alert actions.
Configuring alert actions
- Navigate to Settings > Searches, Reports, and Alerts.
- Select the App you want to use.
- Change the Owner filter value to All.
- Enable, edit, or create the alerts per your requirements.
- Select the required alert action from the list.
Using alert actions
Move a device within an organizational unit (OU)
- Write an SPL query to search for relevant ChromeOS events.
- Configure the alert schedule and other settings as appropriate, such as the alert description.
- Select Alert Action - Move Device to OU.
- On the configuration page of the add-on, select the target OU. The values are based on the OU lookup table, which needs to be populated via the modular data input.
- Select Service Account set up.
- Click Save.
Issue commands to suspend users, wipe devices, reboot devices, or disable devices
- Write an SPL query to search for relevant ChromeOS events.
- Configure the alert schedule and other settings as appropriate, such as the alert description.
- Select the alert action you want to set up:
- Alert Action - Suspend User
- Alert Action - Wipe Device
- Alert Action - Wipe User
- Alert Action - Reboot Device
- Alert Action - Disable Device
- On the configuration page of the add-on, select Service Account set up.
- Click Save.
Additional resources
Still need help? Check out some of the resources below or email our team directly at splunkchrome-external@google.com.
- Google Support Docs: How the organizational structure works
- Google Support Docs: Add an organizational unit
- Google Support Docs: Allow or block apps and extensions