Installing Splunk Connect For Syslog on a Windows network
This article walks you through the steps of setting up a Windows-only computer network to run Splunk Connect for Syslog (SC4S) on a Windows server. SC4S does not run directly on Windows so it needs to run within a container of some kind that is running on Windows - either Docker, Micro Kubernetes, or Hyper-V. This procedure shows the Hyper-V approach and the Podman + systemd method, where syslog messages received at the Windows server are sent to SC4S running within the Linux container. This approach is simpler to deploy and manage than Micro Kubernetes, and is generally preferred by customers over running on Docker. The approach consists of the following steps:
- Prepare
- Install CentOS within the VM
- Install file editing tools
- Install Splunk Connect for Syslog (SC4S)
- Enable the VM to receive Syslog messages
- Direct Syslog traffic to the Windows Server on the configured ports
In this example, CentOS Linux is used. CentOS Linux is reaching end of life in 2024, so you may wish to consider CentOS Stream, Ubuntu, or another Linux distribution. If you do use an alternative distribution, the interface and some commands will differ from the screenshots included in this article, but the overall approach will be the same.
Data required
How to use Splunk software for this use case
Prepare
Host and Windows preparation
Ensure you meet the following prerequisites:
- A host server running Windows 10 Professional or Windows Server 2019. It should have at least:
- 12GB of RAM
- 12 CPU cores
- 500GB of SSD disk space
- The Windows operating system is enabled for Hyper-V. If Windows itself is virtualized, this may mean reconfiguring the hypervisor software so that it expects Hyper-V software. The hypervisor software may treat running Hyper-V as a different option from running a Windows operating system.
- Virtualization options are enabled in the BIOS of the bare metal machine.
You can find more information on installing roles and enabling Hyper-V here:
Hyper-V networking preparation
Follow Microsoft's steps to create a NAT virtual network using the instructions here.
Virtual machine preparation
- Download the CentOS 7.9 minimal install disc ISO file from centos.org.
- In the Hyper-V Manager click New > Virtual Machine to begin to to create and launch the CentOS VM. Click through the wizard using the following configurations:
- When prompted to choose the generation of the virtual machine, choose Generation 2.
- Ensure that at least 4GB of RAM remains for the Windows host OS.
- Do not use dynamic memory.
- On the networking step, select the switch you created while creating the NAT virtual network via Powershell.
- It's ideal to make the disk size between 200 to 300GB. The disk space is primarily for caching inbound data if the connection between the customer data center and Splunk Cloud Platform is lost.
- In installation options, select to install an operating system from a bootable image file and specify the path to the CentOS 7.9 minimal install disc ISO file.
- After completing the wizard, the screen returns to the Hyper-V Manager. On the virtual machine options under the Actions pane, as shown in the example below, click Settings and select the following settings:
- Click Processor and increase the number of CPU cores to at least four.
- Click Security and disable secure boot so the CentOS image can be read.

Install CentOS within the VM
- Use the Hyper-V manager to power on the VM and select the option to install CentOS. You will be taken to the Installation Summary to begin configuring the installation, as shown in the example below.

- Under Localization, click Language Support. Select an English language option and set localization options as needed.
- Under System, click Network & Host Name.
- Switch on the ethernet adapter and specify an IP address within the range of the NAT network you created earlier. The gateway will be the network IP address specified earlier in Powershell. Specify an accessible DNS server, and edit the CentOS VM host name at the bottom of the Ethernet settings.

- Verify all network and hostname options before continuing. The adapter should now show as connected. If not, amend the configuration as needed.
- Click Done to return to the Installation Summary.
- Click Begin Installation.
- Set the root (Administrator) password by clicking Root Password and entering the details.
- Click Reboot when installation completes. After rebooting the virtual machine, a login prompt is presented for the root user.
- While you can use the Hyper-V interface for command-line purposes, a secure shell (SSH) client either via Powershell or Putty provides a better experience. In the example below, Powershell is used with the command
ssh root@<centos_ip_address>. Note that to use the CentOS host name for connections, a name entry is needed in the datacenter DNS server.
- At the CentOS command prompt, type in the command
yum -y install podmanto install Podman in preparation for the installation of Splunk Connect for Syslog.
Install file editing tools
Install Notepad++ and WinSCP to aid in editing the text configuration files on Linux.
Install Splunk Connect for Syslog (SC4S)
To install S4CS, you need to follow the instructions for Linux but use the Windows file editing tools where possible.
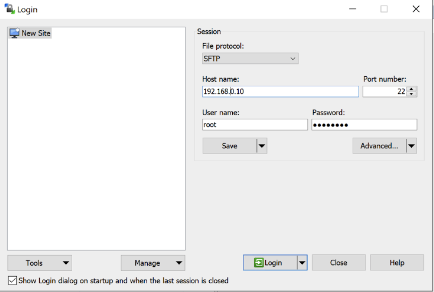
- Set up a WinSCP session for creating and replacing files. Open WinSCP and connect to the CentOS VM with the same hostname, username, and password used earlier for SSH, as shown in the example below. You can then browse and transfer files in the CentOS system.
- Edit and transfer the files
sc4s.serviceandsysctl.conf. Use Notepad++ to createsc4s.servicelocally. You can use the template listed in the Podman + systemd method instructions to do this. - At line 29 of the file
sc4s.service, remove each occurrence of the back slash ( \ ) and the carriage return, and combine each of the lines up to line 40 into the line of text that started at line 29, as shown in the example below.
- Save the file and use WinSCP to copy
sc4s.serviceto the required path,/lib/systemd/system, as shown in the example below.
- Use WinSCP to copy the existing file from the
/etcpath on the CentOS VM. - Add the following entries to the local copy of
sysctl.confas described in the Getting Started instructions:net.core.rmem_default = 17039360 net.core.rmem_max = 17039360
The file should look like the example below:

- Save the file at a convenient location on Windows and use WinSCP to transfer the file back to its original location. Overwrite the file when prompted.
- At the CentOS command prompt, run
sysctl -pto apply the changes. - At the CentOS command prompt, create three essential directories for SC4S on the VM:
/opt/sc4s/local
/opt/sc4s/archive
/opt/sc4s/tls
- Now you need to create a S4CS env file with Splunk parameters. Create the SC4S env file at the path
/opt/sc4s. The parameters for this file will be derived from your Splunk Cloud Platform instance. They are obtained when an HTTP Event Collector (HEC) has been configured. Ensure there are no spaces on either side of the equals sign of each line.
The parameters must be checked before use to be working and entered precisely; otherwise, SC4S will not start.
Here is an example showing the McAfee EPO configuration appended after the essential HEC details. Check Github for other configurations.

- Save the file and transfer it to
/opt/sc4s.
- At the CentOS command prompt, run the following to disable the CentOS internal firewall:
systemctl disable firewalld
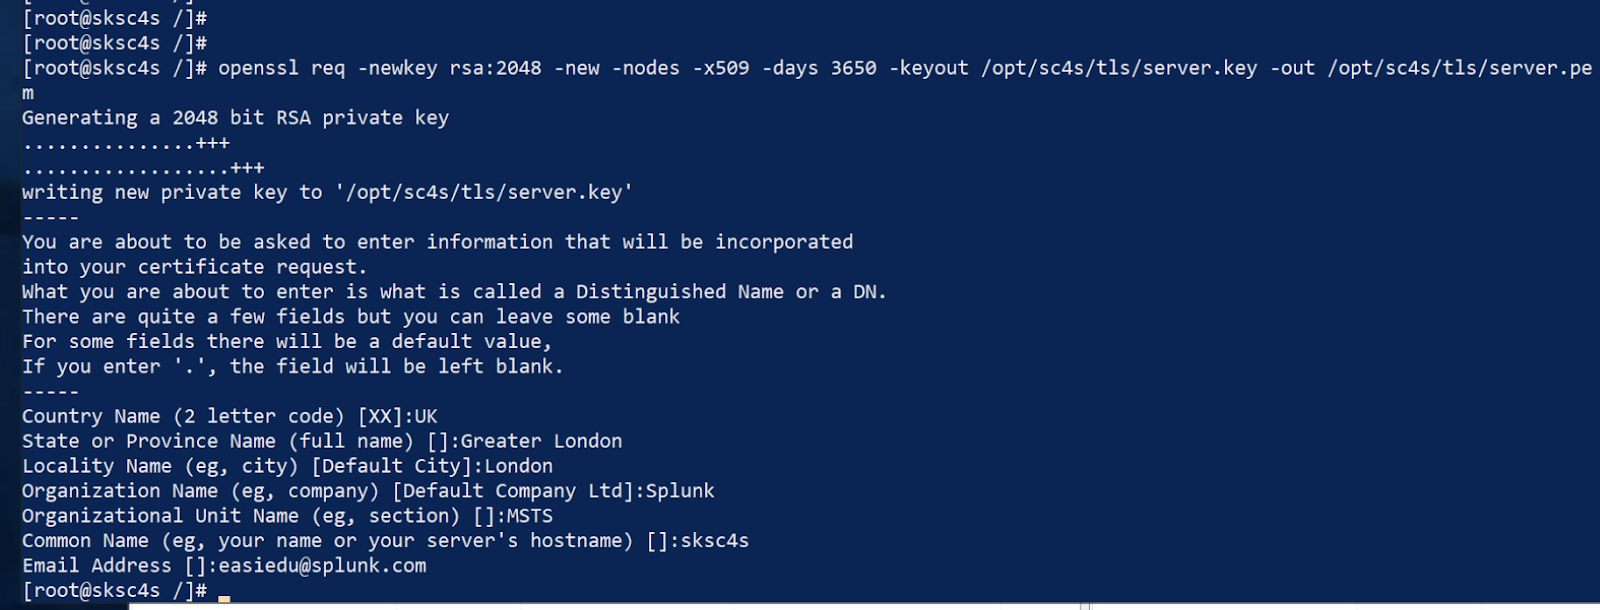
- At the CentOS command line, run the following to generate certificates for secure syslog so that SC4S can receive data over TLS. Answer the questions at the prompt in order to generate the certificate.
openssl req -newkey rsa:2048 -new -nodes -x509 -days 3650 -keyout /opt/sc4s/tls/server.key -out /opt/sc4s/tls/server.pem
- At the CentOS command line, run the following to enable SC4S. You can check this link for more information on starting and enabling the service.
sudo systemctl daemon-reload
sudo systemctl enable sc4s

- At the CentOS command line, run
systemctl start sc4sand then check the startup log result withsystemctl status -l sc4s.service. This starts SC4S and validates successful startup.
- Check for SC4S startup messages in the default index of Splunk where HEC is configured by running the following search:
index=* sourcetype=sc4s:events "starting up"
Enable the VM to receive Syslog messages
This approach directs Syslog messages that are received at the Windows server into SC4S on the CentOS VM. However, the option also exists to use Hyper-V to connect the CentOS VM directly to the LAN at the data centre.
- The standard syslog ports are 514, both for TCP and UDP.
- The standard secure sylog port is 6514 for TCP.
On this basis, Windows will be instructed to send the following traffic to the CentOS VM using the Windows Powershell prompt:
- Port 514 TCP
- Port 514 UDP
- Port 6154 TCP
Enter the following Powershell commands to direct traffic as above. Note that below, the name of the NAT network is the one specified in Hyper-V Networking preparation. It can be derived from Powershell using the command:Get-NetNAT
Add-NetNatStaticMapping -ExternalIPAddress "0.0.0.0/24" -ExternalPort 514 -Protocol TCP -InternalIPAddress "192.168.0.10" -InternalPort 514 -NatName <name of the NAT network>
Add-NetNatStaticMapping -ExternalIPAddress "0.0.0.0/24" -ExternalPort 514 -Protocol UDP -InternalIPAddress "192.168.0.10" -InternalPort 514 -NatName <name of the NAT network>
Add-NetNatStaticMapping -ExternalIPAddress "0.0.0.0/24" -ExternalPort 6514 -Protocol TCP -InternalIPAddress "192.168.0.10" -InternalPort 6514 -NatName <name of the NAT network>
These are example entries of the Powershell port configurations and the outputs on the command line:

Direct Syslog traffic to the Windows Server on the configured ports
The Syslog server is now ready to receive messages. On Syslog sources, provide the IP address or DNS name of the Windows server and the appropriate port for the data being received. SC4S receives the message and sends it to Splunk.
The example below shows a TLS encrypted Syslog message sent to SC4S. The tcpdump output shows that the message text is encrypted over the network, but the event received in Splunk is decrypted to plain text:

The random characters above are received as a readable log in Splunk, as shown in the example below.

Additional resources
These resources might help you understand and implement this guidance:
- Splunk Lantern Article: Understanding best practices for Splunk Connect for Syslog