Configuring SAML authentication for the Splunk platform
SAML authentication, also known as single sign-on (SSO), is an essential mechanism for enhancing security and improving user convenience.
This article shows how to configure SAML authentication using the example of integrating Splunk Cloud Platform with Microsoft Entra ID (formerly Azure AD). Other identity providers (IdP) like Okta can also be used for SAML integration. You can also complete this process using Splunk Enterprise.
The configuration values shown in this article are examples shown in a test environment. When implementing this in a production environment, you should review Splunk Help and Microsoft documentation to ensure that your specific requirements are met.
Prerequisites
Before starting this integration, ensure you have the following:
- Access to the Microsoft Entra admin center (Azure Portal) with one of the following roles:
- Global Administrator
- Cloud Application Administrator
- Application Administrator
- Splunk Cloud Platform or Splunk Enterprise with admin-level access
- Familiarity with SAML concepts and your organization's identity management strategy
How to configure SAML authentication
You'll follow these high-level steps to integrate Microsoft Entra ID with the Splunk platform:
- Create users and groups in Entra ID
- Create and configure the SAML application in Entra ID
- Enable and configure SAML authentication in the Splunk platform
- Configure role mapping
- Verify your configuration
1. Create users and groups in Entra ID
First, prepare the users and groups to be used for the authentication test.
1-1. Verify account permissions
- Sign in to the Microsoft Entra admin center (Azure Portal) through your browser.
- From the left menu, go to Entra ID > Users > Select your username > Assigned roles.
- Confirm that your account has one of the following roles:
- Global Administrator
- Cloud Application Administrator
- Application Administrator

1-2. Create a test user: samltest
Create a user named samltest for test purposes.
- In the Entra Admin Center, select Entra ID > Users from the left menu.
- Click + New user > Create new user.

- Enter the following details:
- User principal name (UPN):
samltest@<tenant_name>.onmicrosoft.com(or your existing custom domain) - Display name:
samltest - Password: Auto-generate or set manually

- User principal name (UPN):
- Ensure "Account enabled" is checked.
- Click Review + create > Create.
This creates samltest as a Microsoft Entra user.
1-3. Create a group: SplunkUsers
- From the left menu, select Entra ID > Groups.
- At the top, click + New group.
- Enter the following details:
- Group type: Security
- Group name: SplunkUsers
- Group description: Any description (for example, "Splunk test users")

- Click No members selected, search for
samltest, select it, and add it. - Click Create.
In a later step, you will need to copy the Object ID of your SplunkUsers group and paste it into the Splunk platform settings for role mapping.
2. Create and configure the SAML application in Entra ID
2-1. Add the app from the Gallery
- From the left menu, click Entra ID > Enterprise apps.
- At the top, click + New application.
- On the "Browse Microsoft Entra App Gallery" screen, enter Microsoft Entra SSO for Splunk Enterprise and Splunk Cloud into the search box.
- Select the app from the results and click Create.

This creates a SAML application template for the Splunk platform on the Entra ID side.
2-2. Entra ID SSO configuration (Basic SAML Configuration)
- On the application screen, click Single sign-on from the left menu.
- Select SAML as the single sign-on method.

- On the "Set up Single Sign-On with SAML" page, click the Edit (pencil icon) for Basic SAML Configuration.

- Configure the following three fields:
- Identifier (Entity ID):
<SplunkServerURL> - Reply URL (Assertion Consumer Service URL):
https://<SplunkServerURL>/saml/acs - Sign on URL:
https://<SplunkServerURL>/app/launcher/home
In this example, we are using
https://teststack.splunkcloud.comin Splunk Cloud Platform. Replace this with your actual URL:- Identifier (Entity ID):
https://teststack.splunkcloud.com - Reply URL (Assertion Consumer Service URL):
https://teststack.splunkcloud.com/saml/acs - Sign on URL:
https://teststack.splunkcloud.com/app/launcher/home
- Identifier (Entity ID):
- Click Save.
2-3. Download the Federation Metadata XML
In the SAML Certificates section on the same page:
- Next to Federation Metadata XML, click Download.
- Save the XML file locally (for example, rename it to
splunk-entra-metadata.xmlfor clarity). You will upload this XML later in the Splunk platform SAML settings.
2-4. Assign the test group to the app
- From the left menu, open Users and groups.
- Click + Add user/group.

- Click None Selected under "Users and groups," search for
SplunkUsers, check it, and click Select. Alternatively, you can assign the usersamltestdirectly.
- Click Assign.
Now, samltest or your SplunkUsers group are authorized to use this SAML application.
3. Enable and configure SAML authentication in the Splunk platform
3-1. Enable SAML authentication
- Log in to the Splunk platform.
- Go to Settings (top left) > Users and Authentication > Authentication methods.
- Select SAML from the list.
- Click the link Configure Splunk to use SAML.

3-2. SAML configuration
- When the SAML Groups page appears, click SAML Config at the top right.
- In the section labeled Metadata XML File, click Select File and upload the Federation Metadata XML that you downloaded from Entra in step 2-3. This will automatically populate IdP information such as the Single Sign-On URL and Issuer ID.

If SAML authentication fails due to a misconfiguration, you might be unable to log in through the standard login URL. To bypass SAML and log in with a local Splunk account, append ?loginType=splunk to your login URL (for example, https://teststack.splunkcloud.com/en-US/account/login?loginType=splunk). We recommend saving this URL before enabling SAML. For more information, see How to login into Splunk using local Splunk accounts after configuring SAML.
- Verify the General Settings:
- Entity ID: This is the Entity ID for the Splunk platform. It must match the "Identifier (Entity ID)" in Entra's basic SAML configuration (see step 2-2). Ensure the values match (for example,
https://teststack.splunkcloud.com). - Sign AuthnRequest: Select this to turn it on.
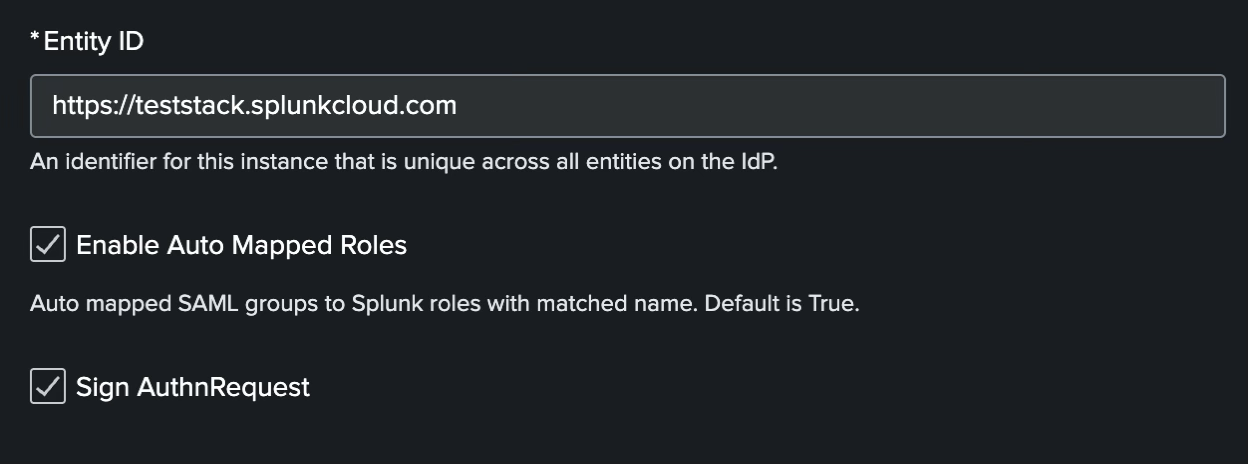
- Entity ID: This is the Entity ID for the Splunk platform. It must match the "Identifier (Entity ID)" in Entra's basic SAML configuration (see step 2-2). Ensure the values match (for example,
- Scroll down to the Alias Section and enter the following values. These values are correct at the time of writing, but you can check the Entra documentation for the latest:
Alias Value Role alias http://schemas.microsoft.com/ws/2008/06/identity/claims/groupsRealName alias http://schemas.microsoft.com/identity/claims/displaynameMail alias http://schemas.xmlsoap.org/ws/2005/05/identity/claims/emailaddress
3-3. Advanced settings
- Scroll to the Advanced Settings section and configure the following:
- Name ID Format: Select Email Address from the dropdown.
- Load balancer hostname or IP address: Enter your actual URL (for example,
https://teststack.splunkcloud.com). - Redirect port — load balancer port: Set to
0(zero).
- Click Save.
4. Configure role mapping
4-1. Confirm the Group Object ID (UUID) in Entra
- In Entra Admin Center, open Entra ID > Groups.
- Click the group you created (for example,
SplunkUsers). - Copy the Object ID (for example,
object-id-12345) from the Overview screen. You need to copy the group's UUID, not the Display Name.

4-2. Create SAML groups and assign roles in the Splunk platform
- In Splunk Web, go to Settings > Authentication Method > SAML > Configure Splunk to use SAML > SAML Groups.
- Click the + New Group button at the top right.
- In the Create New SAML Group dialog:
- Group Name: Paste the Group Object ID (UUID) you just copied.
- Splunk Roles: Select the roles you want to assign (for example,
useroradmin).
- Click Save.
5. Verify your configuration
With these settings, you are now ready to use single sign-on to log in to the Splunk platform using a Microsoft Entra ID account.
- Try logging in with the
samltestuser to verify that the Splunk platform home screen appears correctly and that the appropriate roles are assigned. - If you log in to the Splunk platform as an admin, you can verify the SAML user
samltestunder Settings > Users and Authentication > Users.
Additional resources
The following resources might help you understand and implement this guidance: