Identifying and removing malicious emails with Splunk SOAR from within Microsoft 365 mailboxes
Emails are the primary attack vector threat actors implement when attempting to compromise an account, deploy a malicious payload, or exfiltrate and encrypt data on your systems. When a malicious internet message is identified in your environment, it is important to take decisive action in order to prevent other copies of this message from being accessed by other users.
“Despite widespread awareness efforts, phishing remains a significant threat due to its reliance on human vulnerabilities and the challenge of balancing security policies and operational flexibility.“
Breaches may result in financial fraud via account takeovers, which could lead to the creation of fraudulent accounts and then unauthorized financial transactions. The implications extend beyond safeguarding data and intellectual property as they also encompass the prevention of financial fraud and the preservation of the company’s brand integrity.
Prerequisites
- Splunk SOAR
- MS Graph for Office 365
Additionally, users must have the ability to utilize the MS Graph for Office 365 app within Splunk SOAR to search for target emails within user mailboxes and remove them.
How to use Splunk software for this use case
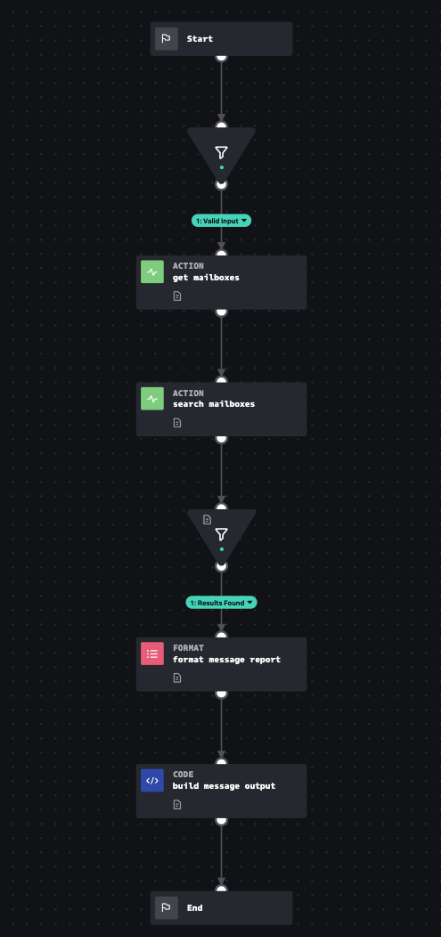
The MS Graph for Office365 Search and Purge playbook accepts an internet message id, asks Microsoft for a list of users with mailboxes to search, and then searches each one to look for records that have a matching internet message id. It will also remove the message from the mailboxes. It then produces a normalized output and summary table. This aligns with MITRE D3FEND techniques Email Removal and Identifier Activity Analysis, which involve taking known malicious identifiers, determining if they are present in a system, and then deleting these malicious artifacts or programs from a computer system.
You can learn more about this playbook, shown in the following diagram, with the MS Graph for Office 365 Search and Purge Playbook Explorer.
Procedure
The following is a guide to configuring Splunk SOAR to connect to Microsoft 365 using the MS Graph for Office 365 app and then implementing the MS Graph for Office 365 Search and Purge playbook in your environment.
First, configure Splunk SOAR to support investigating and performing actions related to the email messages from Microsoft 365:
- If not already present in your SOAR instance, install the MS Graph for Office 365 app from Splunkbase.
- From Splunk SOAR, select Apps, Unconfigured Apps, then search for MS Graph for Office 365, and select Configure new asset.
- Configure your Asset Info and Asset Settings accordingly based on your tenant information (for example, see Add and configure apps and assets to provide actions in Splunk SOAR for more information).
- On the Ingest Settings tab, select email from the Label to apply to objects from this source dropdown. This supports other response actions in SOAR if desired.
Then, configure the MS Graph for Office 365 Search and Purge playbook. From Splunk SOAR, select Playbooks and then edit the MS Graph for Office 365 Search and Purge playbook to run on artifacts labeled “email” from within a Splunk SOAR investigation.
- Search for MS_Graph_for_Office_365_Search_and_Purge and you should see this playbook in the community repository (can also be downloaded from our GitHub repository).
- Place a check in the box for that playbook and select Copy.
- Select local (or your desired repository) as the source control to save to and then Copy.
- Check the box to the left of the copy of the MS_Graph_for_Office_365_Search_and_Purge playbook and choose Edit.
- In the Operates On dropdown, select email.
Do not set the playbook as active or it will automatically run on all ingested email artifacts labeled as “email.”
- In the Category dropdown, select Search and Purge, then choose Save.
From within a Splunk SOAR investigation, you can then run this playbook on the malicious email artifacts present. From an investigation that has email artifacts present:
- Choose the Analyst view.
- Choose the Artifacts tab.
- Place a check in the box to the left of the email artifact you want to purge from all mailboxes, select More in the upper right, then select Run Playbook.
- Verify that the Scope says Artifact and has the applicable artifact number for the email listed in the bottom left of the Run Playbook window.
- Search for MS_Graph_for_Office_365_Search_and_Purge (or just the word “purge”) and look for the copy in your local repository (or the repository you saved yours to).
- Select this playbook and choose Run.
The status of the job will appear in the Activity tab to the left and notes will be added to the investigation with the details of which users mailboxes this email was removed from.
Using the sub-playbooks
The MS_Graph_for_Office_365_Search_and_Purge playbook contains two sub-playbooks, MS Graph for Office 365 Message Identifier Activity Analysis and MS Graph for Office 365 Message Eviction. The first sub-playbook looks for every copy of the message in question across all mailboxes in your environment. After copies are found, the latter sub-playbook handles the removal of these messages. Microsoft does have a "soft-delete" option, which means that messages run through the Message Eviction playbook will be recoverable (see MS Graph for Office 365 Message Restore).
Triggering the MS_Graph_for_Office_365_Search_and_Purge playbook on email artifacts within a Splunk SOAR investigation ensures that the identified malicious email message in your environment is purged from all mailboxes it is present in. A report is then generated with the results of these actions and placed in the Notes section of the investigation. This report also captures the message ID and the mailboxes they were removed from so that they can be restored later if desired.
Ad-hoc deletion of a malicious email from a mailbox can also be done individually through Splunk SOAR via the delete email action available through the configured MS Graph for Office 365 app integration. This requires you to input the values for messageId as well as the toEmail fields, both of which can be found in the artifact.
Next steps
Splunk Security Content has many more phishing playbooks based on other vendor's products that can integrate with Splunk SOAR. In addition, the following resources might help you with this use case:
- Splunk Resource: Implementing SOAR community playbooks
- Splunk Help: Run a playbook in Splunk SOAR (On-premises)
- Splunk Lantern Article: Detecting Office 365 attacks
- Splunk Lantern Article: Detecting cloud federated credential abuse in Windows
- Splunk Blog: Phishing Scams & Attacks: A Complete Guide
- Splunk Resource: MS Graph for Office365 Search and Purge
- Splunk Resource: MS Graph for Office 365 Message Restore