Automating the investigation of emails for malicious content
When users report suspected phishing emails, security teams need to analyze these reports in a consistent and efficient manner. Often, the vast majority of these submissions turn out to be false positives, or simply spam messages. The volume of these submissions can cause crucial information needed to validate and respond to true malicious reports to be missed.
Where phishing is used as an initial attack vector, account compromise can occur. After a threat attacker gains access to an account they can then escalate privileges, perform lateral movement, and exfiltrate data. This can lead to financial fraud through account takeover, new account creation, and unauthorized transactions. Preventing account compromise via phishing impacts data and intellectual property protection, as well as helping to prevent negative impacts to brand reputation.
Prerequisites
- Splunk SOAR
- Splunk Attack Analyzer
- A SOAR email integration, such as MS Graph for Office 365
Additionally, users must be able to submit suspected phishing emails to then be sent to Splunk SOAR and Splunk Attack Analyzer.
How to use Splunk software for this use case
When coupling Splunk SOAR in conjunction with Splunk Attack Analyzer, security analysts can automate to efficiently investigate these submissions, and gain rich contextual details on the full attack chain. After the analysis within Splunk Attack Analyzer, further actions can be taken within Splunk SOAR to ensure these threats are contained and blocked appropriately in the environment.
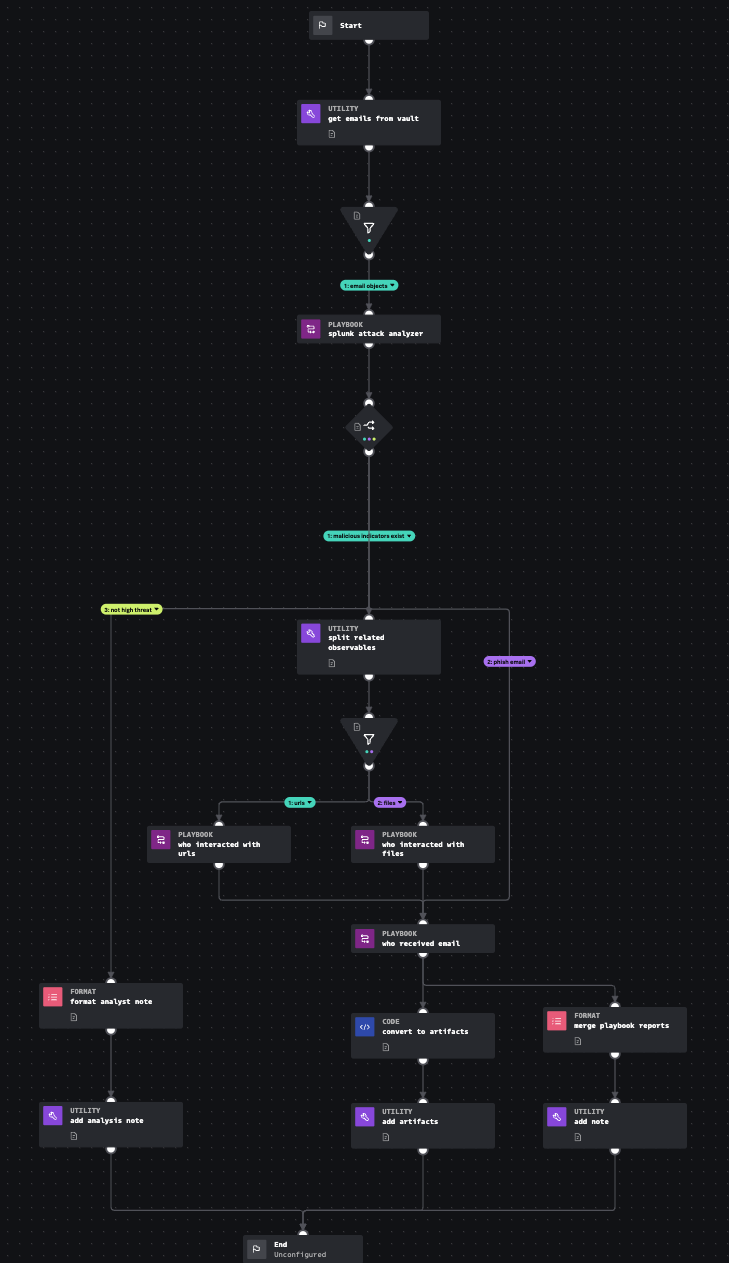
The Splunk Automated Email Investigation playbook leverages Splunk SOAR and Splunk Attack Analyzer to determine if a .eml or .msg file is malicious, if it contains suspect URLs or files, and who might have interacted with the IoCs (email, URLs, or files). This aligns with MITRE D3FEND technique Dynamic Analysis, which involves executing or opening a file in a synthetic "sandbox" environment to determine if the file is a malicious program or if the file exploits another program such as a document reader. It also aligns with Sender Reputation Analysis, which determines sender reputation based on information associated with a message (for example, email or instant messaging).
You can learn more about this playbook, shown in the following diagram, with the Splunk Automated Email Investigation Playbook Explorer.
Procedure
The following is a guide to configuring Splunk SOAR to connect to Splunk Attack Analyzer and then implementing the Splunk Automated Email Investigation playbook in your environment.
First, you need the API key from Splunk Attack Analyzer. As a user with an Administrator role, you can follow these steps to create an API key:
- From Splunk Attack Analyzer, select your username, then API Keys.
- Select + New Key.
- In the Name field, enter a name for the API key.
- (Optional) In the Description field, enter a description for the API key.
- Set the Key Expiration from the menu. By default, keys are set to Never Expire.
- Set the permissions that you want the API key to have.
- Select Save.
A modal appears letting you know that your API key was successfully created, and it also displays your API secret.
Next, you need to configure the Splunk Attack Analyzer asset within Splunk SOAR:
- From Splunk SOAR, select Apps, then Unconfigured Apps, then search for Splunk Attack Analyzer and select Configure new asset.
- From the Asset Info tab, enter information in the following fields. The Automation Broker field is not relevant for this connector.
- In the Asset name field, enter a name for the asset.
- In the Asset description field, enter a description for the asset.
- (Optional) In the Tags field, enter tags to associate information from this connector with certain playbooks.
- Select Save.
- Select the Asset Settings tab, and enter information in the following fields.
- In the API token from the app field, enter the API token from Splunk Attack Analyzer.
- (Optional) Specify the time range in hours that you want the connector to use. If no time range is specified, the default time range is the past 24 hours.
- Select Save.
- Select the Ingest Settings tab and configure how often you want the connector to poll Splunk Attack Analyzer for data.
- Select a Label to apply to objects from this source. Labels are used to categorize information and you can run a playbook against labels.
- Select either Manual or Interval polling from the drop-down menu. Select Interval and enter a polling time in minutes to have the connector poll Splunk SOAR in intervals. For example, enter 30 minutes to have the connector check for new Splunk SOAR data every 30 minutes. Or, select Manual and then Poll Now to have the connector poll for data now.
- Select Save.
- Select the Approval Settings tab to add or edit primary and secondary approvers for sending or ingesting data from Splunk Attack Analyzer.
- Select the Access Control tab to configure what users or roles have access to the Splunk Attack Analyzer connector.
After you configure your desired fields for the connector, select the Asset Settings tab and then Test Connectivity to test whether or not the connector is working.
Now, you need to enable the Splunk Automated Email Investigation playbook. From Splunk SOAR, select Playbooks and then use the following steps to edit the Splunk Automated Email Investigation playbook to run automatically when artifacts labeled “email” are brought into Splunk SOAR:
-
- Search for Splunk_Automated_Email_Investigation and you should see this playbook in the community repository.
- Place a check in the box for that playbook and select Copy.
- Select local (or your desired repository) as the source control to save to and then Copy.
- Select the Splunk_Automated_Email_Investigation playbook you just copied to edit it.
- Select Settings in the Visual Playbook Editor screen, and toggle Active, then Save.
Finally, configure Splunk SOAR to ingest email artifacts. You can use whatever integration is available for your email platform on Splunkbase but we will highlight O365 for this example:
- Install the MS Graph for Office 365 app from Splunkbase.
- From Splunk SOAR, select Apps, Unconfigured Apps, then search for MS Graph for Office 365 and select Configure new asset.
- Configure your Asset Info and Asset Settings accordingly based on your tenant information (for example, see Add and configure apps and assets to provide actions in Splunk SOAR for more information).
- On the Ingest Settings tab, select email from the Label to apply to objects from this source dropdown.
Now, when new artifacts are generated and pulled into Splunk SOAR with label "email", the Splunk Automated Email Investigation playbook automatically runs and provides a report from Splunk Attack Analyzer on the verdict, maliciousness, and all threats detected within a suspected phishing email submission.
This can also be connected to a "Report suspected phishing email" button in your email platform so that these submissions are ingested into SOAR. Splunk SOAR can be configured to use the "get email" or "on poll" actions from a monitored folder where phishing submissions are stored with the applicable integration, such as MS Graph for Office 365.
Next steps
The Splunk Automated Email Investigation process will ingest suspected phishing emails from your email solution, analyze the threat objects found within them, and look for all interactions with the files and URLs analyzed by Splunk Attack Analyzer to see if anyone else in the organization was exposed to or acted upon them. This provides detailed object enrichment surrounding the attack attempt and allows Splunk SOAR to take automated containment and response actions on the risk and threat objects identified to prevent further compromise, loss of data, and financial loss.
Splunk Security Content has many more phishing playbooks based on other vendor's products that can integrate with Splunk SOAR. In addition, the following resources might help you with this use case:
- Splunk EDU: Implementing SOAR community playbooks
- Splunk Lantern Article: Email data
- Splunk Help: Run a playbook in Splunk SOAR (On-premises)
- Splunk Help: Create and manage API keys in Splunk Attack Analyzer
- Splunk Help: Configure the Splunk Attack Analyzer Connector for Splunk SOAR
- Splunk Help: Add and configure apps and assets to provide actions in Splunk SOAR
- Splunkbase: MS Graph for Office 365