Integrating SOAR with Azure AD SAML
Integrating Splunk SOAR with Azure Active Directory (Azure AD) using SAML provides several key benefits, particularly in terms of security, usability, and centralized identity management. These include:
- Centralized identity and access management
- Enhanced security by delegating authentication to your trusted identity provider
- Streamlined user onboarding
- Streamlined integration with other azure services
- Improved incident response
In addition, this integration includes multiple compliance-friendly features, which are valuable additions for organizations seeking to optimize their security operations and ensure secure, scalable access to their SOAR platform.
This article explains how you can set up this integration.
Data required
How to use Splunk software for this use case
Create a non-gallery app for Splunk SOAR
The Azure AD tenant is required for this configuration and the subscription is freely available. Consult with the Azure AD administrator of your organization for assistance. When you have access, complete the following steps.
- From the left pane in the directory Overview, click Enterprise applications.

- In the main panel, click New application.

- Click Create your own application as Splunk SOAR is not part of the Azure AD App Gallery.

- In the window that pops up, name the app in the text box, select the Non-gallery option and click Create.

- The Splunk SOAR app is created and you should be automatically redirected to the app’s Overview page.
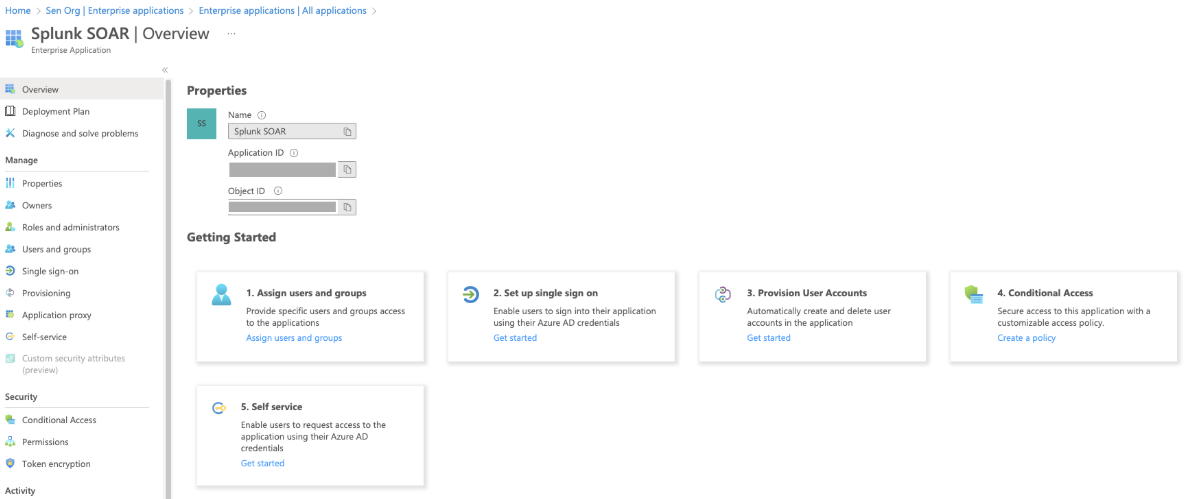
However, if you are not automatically redirected, navigate to the Enterprise applications page and the Splunk SOAR app should be available there to click on. You might need to click Refresh to view it.
Configure SAML in Azure AD
- From the left pane in the app Overview, click Single sign-on. Alternately, you can click the Set up single sign on chiclet on the app’s main panel.

- Click the SAML chiclet.

- Under Basic SAML Configuration, click Edit..

- Click Add identifier and Add reply URL to set the required fields from the pop up window.

- Set the following three fields, then click Save to save changes.
- Identifier (Entity ID). This is a unique ID across the Azure AD to identify the Splunk SOAR app for audience restriction purposes. It can be any name/ID.
- Reply URL (Assertion Consumer Service URL). This is the ACS URL for SOAR app to receive the authentication token and follows the format of
https://<SOAR_INSTANCE_URL>/saml2/callback/login. - Sign on URL. This is the URL of the page to be redirected after a login. It is usually the SOAR home page URL.

If you aren't sure what values to use, values for Identifier and Reply URL can be found in SOAR App’s UI by navigating to Administration > User Management > Authentication > SAML2 (switch on SAML2 if that’s not done) > Configuration Info.

- On the Set up Single Sign-On page, click Edit under Attributes & Claims.

- On the Attributes & Claims page, click Add a group claim.

- Set the following values as shown below, then click Save. These settings are used in step 2 in the Create and assign users and groups section.
- Security groups. Selecting this value as the Azure AD groups to be created for SOAR users will have the Group type as Security. You can also select All groups if the Group type of the Azure AD group is different.
- Source attribute. Select Group ID as the values to be assigned to this group claim, which is the Object Id value of the Azure AD group created. This information will make more sense in the Azure AD groups and users creation.
- Name. Set a custom name for the group claim to be sent in the SAML token, so it can be easily recognizable and configured at in Splunk SOAR.

- The newly created group claim is added under Additional claims.

- Navigate back to the Set Up Single Sign-On page and take note of values set for following settings. Click the copy icon to copy the full URL to your clipboard.
- App Federation Metadata Url
- Login URL
- Microsoft Entra Identifier
.png?revision=1)
- Under SAML Certificates, click Edit.
.png?revision=1)
- Under Signing Options, select Sign SAML response and assertion, then click Save.

Create and assign users and groups
These steps assume you have already created users and groups in Azure AD. If not, complete that step and then return to this document. Consult with the Azure AD administrator of your organization for assistance.
- From the left pane in the app Overview, click Users and groups to validate that your assigned users are available.

- The Azure AD free license does not support group assignments. Instead, you can assign individual users to the Splunk SOAR app and find the group these users were assigned to from the Azure home page by going to Azure Active Directory service > Groups > SplunkAdmins.
- Object Id. This is the unique ID to identify the Azure AD group, in this case SplunkAdmins group.
- In step 8 of the Configure SAML in Azure AD section, you selected Group ID as the source attribute to emit this Object Id as the value for group claim named saml_groups. Similarly, in step 8, you selected Security for the Group type to match the Type value for this group.
- In the screenshot below, the total and direct members count is shown as 2, because the two users created previously are assigned to this group.

Configure SAML in Splunk SOAR
- Log into your Splunk SOAR instance and navigate to Administration > User Management > Authentication.

- Click SAML2 and toggle SAML authentication to ON.

- Set the following values in each field:
- Provider Name. A unique name to identify this SAML2 connection configuration. This same name will show up in the Splunk SOAR login page to initiate the SAML2 authentication.
- Splunk SOAR Base URL. Users will be redirected to this URL after a successful login, usually SOAR home page URL.
- Assign the following three settings the values noted from the step 10 of the Configure SAML in Azure AD section.
- Single-sign-on URL. Login URL
- Issuer ID. Microsoft Entra Identifier
- Metadata URL. App Federation Metadata URL
The Metadata XML doesn't need to be set because the Metadata URL is already configured. Only one of these two needs to be configured with a value. If configuring Metadata XML, you need to download the Federation Metadata XML from the page shown in step 10 of the Configure SAML in Azure AD section, and copy and paste the complete content of the XML file to this field.

- Expand the Advanced section and set the following values in each field. Then click Save Changes at the bottom right corner.
- Response Signed. Select this so that responses coming from the Azure AD need to be signed with a valid certificate, otherwise they will be rejected.
- Request Signed. Select this so that requests coming from the Azure AD need to be signed with a valid certificate, otherwise they will be rejected.
- Assertion Signed. Select this so that the SAML assertion sent from the Azure AD needs to be signed with a valid certificate, otherwise it will be rejected.
- Assign the following two settings the values of the Configure SAML in Azure AD section.
- (Optional) A Group Delimiter needs to be configured if multiple Object Id values are passed within a single XML element for the saml_groups attribute. This is to identify the individual values separately. It is not required with this Azure AD setup, as the values are passed with separate child XML elements.
- Group. This is the Object Id of the Azure Group
- Splunk SOAR Role. This is the SOAR role to be assigned for users from the Azure AD group configured in the group.

Next steps
These resources might help you understand and implement this guidance: