Securing the Splunk platform with TLS
To maximize the security of your Splunk platform environment, implementing TLS correctly is essential. A robust TLS setup ensures your connections are encrypted and reduces the risk of man-in-the-middle attacks for your SIEM.
This article is split into a number of different sections:
- TLS basics: High-level TLS concepts you need to know
- Using OpenSSL commands: How to use OpenSSL to test TLS connectivity, view a certificate, verify that the private key and certificate match, build your certificate chain, and verify your certificate chain
- Where the Splunk platform uses TLS: A guide for understanding the functions of TLS in the Splunk platform
- How to secure Splunk platform with TLS: A phased process to secure your environment with TLS. You'll start by putting certificates in place and enabling TLS across various configuration files (management, forwarding, and web). Then, you'll harden the environment with TLS verification settings
- Enable TLS verification: How to enable verification for deployment server connections and TLS forwarding
- Splunkbase apps connection: How to reset the “Browse More Apps” and app update checking feature in the UI
- Common TLS troubleshooting: How to remediate when the connection with OpenSSL hangs, or when you receive the error messages "Unable to get local issuer", "Self-signed certificate in chain" or "Key values mismatch"
TLS basics
There are some terms that you will need to understand before you can properly implement TLS in your Splunk environment. If you don’t understand what all of these words mean, you won’t be able to put the pieces in the correct spots.
- Private keys. All certificates use private keys.
- Root and intermediates use their key strictly for signing CSRs.
- A leaf certificate will use its private key for decrypting received data.
- RSA. This is the encryption algorithm used for private keys, as required by Splunk. You can generate your key in another format, but you need to convert it, using OpenSSL, into RSA format.
- Certificate signing request (CSR). This is a collection of details about a server or set of servers. A CSR must be signed by a CA certificate. See more information on CSRs below.
- Certificate authority (CA). This is a trusted authority that controls the root and intermediate certificates that are used to sign CSRs into leaf certificates. This might be you, another team internally, or even a third party vendor.
- Root and intermediate certificates. Commonly referred to as “CA” or “Issuer” certificates. Typically, but not always, a root signs one or more intermediate certificates and those intermediate certificates sign leaf certificates.
- Leaf certificates. These are the certificates that represent one or more servers. The leaf certificate is used in the TLS connection for encryption. It is common for these certificates to be referred to as “Server” or “Client” certificates. See more information on leaf certificates below.
- Full chain. This means that for a given TLS connection, we have all of the appropriate certificates required to establish a trusted connection.
- PEM. This is the data format of the certificate, as required by Splunk. You can get your certificate in another format, but you need to convert it, using OpenSSL, into PEM format. See more information on PEM below.
- Mutual TLS (mTLS). Mutual TLS refers to a specific verification setup that implies the initializing client validates the remote host’s certificate, and the remote host validates the initializing client’s certificate.
Leaf certificates
There are three “types” of server certificates. Note that these are not official terms and instead are more like concepts.
- Server certificates
- Individual certificates. Match one server only
- Multi-host certificates. Match more than one server, specifically listed out
- Wildcard certificates. Match all servers of a specific domain
Another type of leaf is the client certificate. These can be requested by the remote server before allowing the connection through in a process known as mTLS.
- Forwarder/client certificates. These are strictly used when a setting called
requireClientCert=trueis set on the Splunk server being connected to. The client must present its own certificate that the remote server wants to validate before responding further. This can be tricky because this certificate doesn’t need to represent the client. For example, if the client's hostname is “splunk-UF” but the client certificate Common Name (CN) is “All_My_Forwarders”, that is still valid. Think of these more like a password than a certificate, conceptually.
When we say a “certificate is for this server” what we really mean is that the Common Name or Subject Alternative Name (SAN) contains an entry that matches the way we are connecting to that particular server.
For example, let’s say we have a server called “splunk-searchhead” with a Fully Qualified Domain Name (FQDN) of “splunk-searchhead.splunk.buttercup.com” and an IP address of “192.168.1.1”.
- Person A. In their browser, uses “https://192.168.1.1”
- Person B. In their browser, uses “https://splunk-searchhead.splunk.buttercup.com”
If we would like both users to achieve a “Connection Secured” message, that would require that the certificate lists all of the potential ways that people or other servers will use when they initiate a connection. We achieve this by using the SAN to list out all of the potential ways you could reference the intended server. In our example case, that means “IP: 192.168.1.1” and “DNS: splunk-searchhead.splunk.buttercup.com” must be on the SAN (or CN). The CN is typically going to be the shortname of the server if possible; otherwise, it should be the FQDN.
Wildcards
A wildcard allows for any number of values in the leftmost position of the DNS entry. If we refer to our previous example, that means a valid wildcard for our case would be “*.splunk.buttercup.com”.
You specifically can only wildcard the leftmost position, and nothing can come before it. In other words, something like “splunk-*.splunk.buttercup.com” is invalid. The purpose of a wildcard certificate is to cut down on the administrative overhead of having to manage a bunch of individual certificates across your Splunk servers. With a wildcard, you only have to maintain one certificate across multiple servers instead of dozens or even hundreds of individual certificates. This provides a smoother experience by allowing you to use deployment mechanisms like the deployment server, cluster manager, and search head deployer.
Certificate signing request (CSR)
A CSR contains information about a specific server or subset of servers. The CSR must be signed by an issuer certificate in order to become a leaf (client/server) certificate. When generating the CSR, there are a few important items to be aware of:
- The private key used in the CSR is required only on the system that the certificate is for (not the issuer, not clients connecting to it, etc). Do not lose this, because the certificate won’t work without it. Also, do not put a passphrase on the private key if you plan to use
requireClientCert=true! - The CN of a server certificate cannot match the CN of its issuer certificates. Matching is called being self-signed and will make the certificate invalid.
- The date range must be valid. Check the Not Before and Not After fields displayed on the certificate.
- The Subject Alternative Name(s) (SAN) are crucial for proper implementation if you turn on TLS verification. In Splunk platform, the SAN is used to verify that who you are connecting to is who the certificate is actually for. Whatever you put in your Splunk platform configuration files (like
targetUritype settings), in your browser, or in a command line must be in the SAN for a valid and verified TLS connection. A SAN can include one or all of the following:- Hostnames. Generally shortname or FQDN of the system.
- DNS aliases. If you have any DNS records that may be used to refer to the system.
- Wildcards. Generally the domain of your Splunk systems. You can have more than one wildcard if needed. For each wildcard, only the leftmost subdomain can be wildcarded.
- Correct:
*.example.com- This will not work if the hostname is something like host.sub.example.com. The proper wildcard for that would be *.sub.example.com. - Incorrect:
host.*.example.com- This won’t work because the wildcard must be at the start.
- Correct:
- IP. Any IP address that can be used to connect to the system.
If you’re using wildcard certificates, put the wildcard in the CN/SAN. Otherwise, the CN should be the host FQDN, and the SAN should include shortname, FQDN, IP, and any aliases.
PEM certificates
All certificates in the Splunk platform must be in PEM format. If you receive a different certificate format from your PKI team, you can usually convert these to PEM with the openssl command. You can find this using any search engine with a string like openssl convert X to pem.
Here’s an example of what PEM format looks like (but expect it to be much longer):
| Certificate | Private Key |
|---|---|
|
|
|
For more information on TLS connections, check these resources from the Internet Society, Cloudflare, and The SSL Store. For more information on creating your own certificate authority, check this resources from Go Linux Cloud, which explains the end-to-end process of setting up a root, intermediate, and leaf certificate. Before you do this, make sure that you are following best practices and security policies in your organization around PKI and certificate generation. Creating your own certificate authorities might be a mistake if you have an established process already.
Using OpenSSL commands
The OpenSSL program comes with every installation of Splunk platform, including the forwarder package. This means that it's a useful and readily available tool to use for validating TLS connections and generating or signing CSRs. Various arguments can be provided to emulate the settings that Splunk platform uses to attempt to validate the certificate.
It is important to understand that this is just an emulation. If you do not provide proper input to the command (the proper hostname, port, CA file, etc), you will not be testing in a manner that accurately reflects your Splunk platform configuration, so the results can lead to you an invalid conclusion as to what the problem is.
Test TLS connectivity
To check basic connectivity, this command is usually your first go-to. You may want to include the -quiet flag if you’d just like to see whether the connection is having issues. You likely need to pass the -CAfile parameter, unless your instance has a publicly trusted TLS certificate.
openssl s_client -connect host:port
openssl s_client -CAfile /path/here/cabundle.pem -connect host:port
openssl s_client -connect host:port -quiet
This command lets you see the actual certificates returned by the server you’re connecting to. This can be handy to make sure you see the correct certificates.
openssl s_client -connect host:port -showcerts
openssl s_client -connect host:port -showcerts -CAfile /path/here/cabundle.pem
View a certificate
Sometimes you might need to “view” a certificate so that you can see details such as the subject, issuer, SAN, CN, and expiration. This is the equivalent of clicking the little lock icon in your browser.
openssl x509 -noout -text -in cert.pem
Certificates typically have several fields that determine the validity of that certificate. Typical fields are:
- Version. Version number.
- Issuer. The entity (typically a Certificate Authority (CA)) that issued the certificate. In order for a certificate to be trusted, its issuer must be trusted.
- Signature. The signature of the issuer.
- Subject. The entity to which this certificate applies. In the case of TLS certificates for websites, the subject is an LDAP-like string, featuring a CN, or Common Name, of the site providing the certificate. Compare the CN field with the Subject Alternative Name (SAN).
- Validity. Start and end dates for the validity of the certificate. If the current date is not within the validity range of the certificate, it is considered invalid.
Verify private key and certificate match
In order for your Splunk platform instance to be able to decrypt traffic sent to it, it needs to have the correct private key. When implementing TLS, it’s critical to check that you have the correct private key for your certificate. The output of these two commands must match. If your instance doesn’t allow you to run the md5 command, simply remove the last pipe from these commands.
openssl x509 -noout -modulus -in cert.pem | openssl md5
openssl rsa -noout -modulus -in privkey.key | openssl md5
Build your certificate chain
- Take all of the certificate blocks you have and place them into separate files. They’re only text, so you don't need any programs other than a text editor.
- Run the following command against each of the separated certificate files:
openssl x509 -noout -issuer -subject -in somecert.pem - Find the certificate with the subject that matches the server you’re working on. This is your leaf (client/server) certificate.
- Find the certificate where the subject matches the issuer of the leaf certificate identified in the previous step.
- If the issuer and subject of this certificate are the same, then you signed the leaf certificate with a root certificate. This isn’t recommended, but it is allowed. Go to step 6.
- If the issuer and subject of this certificate are different, then you’ve identified the intermediate certificate.
- Find the certificate where the subject matches the issuer of the intermediate certificate identified in the previous step. This is the root certificate, which means you have a complete chain. If the issuer and subject are different, then you either:
- have multiple intermediates (this is fine - repeat this process until you reach the root certificate)
- are missing the root certificate (in which case, you cannot proceed until you have it)
- Put the leaf certificate followed by the private key for that leaf into a single file. There should only be two blocks of text inside this file, meaning do not include issuer certificates. This file is your
clientCertorserverCert. - Combine the intermediate(s) and root into a single file. Put these in order based on what you discovered in step 5. Typically you’ll have an intermediate followed by the root and nothing else. If you have multiple intermediates, then put them in order. In other words, if X issued Y and Y issued Z, then the order is Z at the top, Y in the middle, and X at the bottom. No private keys or leafs should go in this file. This is your
sslRootCAPath. - To validate this programmatically, refer to Verify your certificate chain.
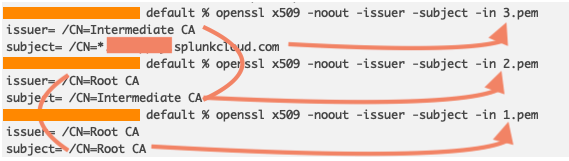
In the output above, you can see that 3.pem is the leaf certificate, 2.pem is the intermediate certificate that signed the leaf certificate, and 1.pem is the root certificate that signed the intermediate certificate. The root is self signed, so you have the full chain and stop there. The contents of 1.pem and 2.pem will be for sslRootCAPath, and the contents of 3.pem will be your client/serverCert, depending on what you’re configuring.
Verify your certificate chain
After you’ve identified that you have all of the correct certificates, next you’ll verify that the chain is complete and in the correct order.
- If you don’t still have all of the certificates in separate files, split them up into their own files.
- Make sure that the root certificate trusts the intermediate. If you have multiple intermediate certificates, you may want to repeat this for those, but this command can let you know if there is a problem:
openssl verify -CAfile root_ca.pem intermediate_ca.pem - If step 2 validates as expected, then use the CA bundle from what you created in Build your certificate chain to verify the entire chain trusts the leaf certificate:
openssl verify -CAfile ca_certs.pem server.pem
Where the Splunk platform uses TLS
First, it’s important to understand that a Splunk server typically only needs one certificate that it will use for all functions for that particular server. There is rarely a need to use a different certificate per port/function, but doing so is fully supported if you fall into that edge case.
The four main functions in the Splunk platform are:
- Management. This covers intra-Splunk communications such as search head to indexer or client to deployment server, the REST API, KVStore, and HEC.
- Splunk Web. This covers the Splunk GUI itself.
- Data forwarding and receiving. This covers “S2S” or Splunk-to-Splunk forwarding. It also covers TCP/UDP listeners.
- Intra-cluster replication. Specifically refers to search head cluster replication and indexer cluster replication. This is uncommon compared to the previous three functions.
All functions default to a single CA file bundle location. There is never a situation in which you need to configure the sslRootCAPath multiple times or even using different files. Doing so is not a good idea and will increase the configuration complexity. The main point is that if you trust a CA, it belongs in the bundle. There is no such thing as providing “too many CAs”, however, not having all of the necessary CAs will cause you verification issues.
The guide that follows assumes that you will use the same certificate for all functions. If you need to use multiple certificates, you’ll be fine as long as you understood all of the concepts laid out so far to adjust the instructions that follow.

How to secure the Splunk platform with TLS
This section walks you through a phased process to secure your environment with TLS. You should follow this process in order:
- Review configuration notes
- Validate your certificates and files
- Set up TLS on Splunk Enterprise servers
- Set up TLS on universal forwarders
- Set up TLS for Splunk to Splunk receiving/forwarding
Prerequisites
Before you get started you will need:
- A certificate for each Splunk Enterprise or intermediate universal forwarder server that has a valid CN and SAN list. This means that the same certificate will be used for all TLS functions (Web/Forwarding/Management) for that given host. You can use a wildcard certificate or put multiple server names in a single certificate.
- (Optional) A single client (“forwarder”) certificate that is signed by a CA that you will include in your CA bundle. This is only required if you intend to set
requireClientCert=trueon your Intermediate Forwarder or Indexer. - The private keys and passphrases (if used) used during the CSR for the above certificates.
- All of the root and intermediate certificates used for signing the above certificates.
Example environment
- 100 universal forwarders with various names
- 2 intermediate universal forwarders (
iuf01,iuf02) - 1 search head (
sh01) - 1 deployment server (
ds01) - 5 indexers (
idx01…05) - 1 monitoring console (
mc01) - All managed Splunk systems in the
splunk.buttercup.orgdomain - One internal root and intermediate authority
Here are some examples of what this could look like, but in practice you can mix-and-match however you see fit.
Unique certificates: 10 server certificates, 1 root, 1 intermediate, 1 client certificate
CN = iuf01
SAN = iuf01, iuf01.splunk.buttercup.org, 172.16.0.1
CN = sh01
sh01, sh01.splunk.buttercup.org, 172.16.0.3
Wildcard certificates: 1 server certificate, 1 root, 1 intermediate, 1 client certificate
CN = *.splunk.buttercup.org
SAN = *.splunk.buttercup.org
All host certificates: 1 server certificate, 1 root, 1 intermediate, 1 client certificate
CN = ManagedSplunkServers
SAN = iuf01, iuf01.splunk.buttercup.org, 172.16.0.1, iuf02, iuf02.splunk.buttercup.org, 172.16.0.2, sh01, sh01.splunk.buttercup.org, 172.16.0.3, ds01, ds01.splunk.buttercup.org, 172.16.0.4, etc, etc
Tiered host certificates: 5 server certificates, 1 root, 1 intermediate, 1 client
CN = Indexers
SAN = idx01, idx01.splunk.buttercup.org, 172.16.0.5, idx02, idx02.splunk.buttercup.org, 172.16.0.6, … idx05, idx05.splunk.buttercup.org, 172.16.0.9,
CN = IntermediateForwarders
SAN =  iuf01, iuf01.splunk.buttercup.org, 172.16.0.1, iuf02, iuf02.splunk.buttercup.org, 172.16.0.2
Splunk TLS configuration parameters explained
Here are some simplified definitions for the various parameters used when setting up TLS in Splunk platform:
serverCert- When I receive a connection, this is the certificate I will present to the client.clientCert- When I establish a connection, this is the certificate I will present to the remote server.sslRootCAPath- This is the collection of issuer certificates that I trust. I'll refer to this bundle when I’m asked to validate a TLS connection.sslVerifyServerCert- When I establish a connection, I’ll check if whoever issued the certificate being presented to me is also in my sslRootCAPath. I will not verify if they are who they say they are.sslVerifyServerName- When I establish a connection, I’ll check if the name I’m using to connect to the remote server is on the SAN list of the certificate being presented to me.requireClientCert- When I receive a connection, I'll require the client to present a certificate. I’ll check if whoever issued the certificate being presented to me is also in mysslRootCAPath. I will not verify if they are who they say they are.ssl[Common/Alt]NameToCheck- When I establish a connection, I'll look at the [CN/SAN] of the certificate being presented to me and check if it matches the [CN/SAN] I require. I will not verify if they are who they say they are.
Information for Splunk Cloud Platform users
In order to send data to Splunk Cloud Platform, the connection is secured with TLS in the 100_x_splunkcloud app (also referred to as the UF Credential Package.
- Prior to May 2025, this app came with a server.conf file that sets sslRootCAPath.
- Post May 2025, this app moved sslRootCAPath specifically to be under the outputs.conf Splunk Cloud stanza.
If you are on the older version of the configuration using server.conf, you should either update to the new app version or implement the workaround below.
The Splunk Cloud Platform outputs app has sslRootCAPath set in default/server.conf. It's recommended to name your app 000_uf_tls and set sslRootCAPath in local/server.conf in this new app, as this will ensure that it wins out over the Splunk Cloud Platform app. When structuring the file that you point sslRootCAPath to, the intermediate certificates go above the root certificates. Additionally, you can put comments with a hash mark (#Like this) above each certificate block so you can more easily keep track of what each certificate block is for. Your final CA combination should have both the Splunk Cloud Platform intermediate/root certificates (100_x_splunkcloud/default/stack_cacert.pem) and your own root/intermediate certificates inside of a single file that the 000_uf_tls app points to in local/server.conf. If done correctly, you will be able to secure your on-premise Splunk communications and also securely forward to Splunk Cloud Platform without any issues.
1. Review configuration notes
Within this process, note that the file paths for serverCert and clientCert and their applicable certs will vary depending on what type of certificates you use.
- If you use a wildcard certificate or a certificate that has all the Splunk hosts on it, then you can include it inside of an app and deploy it to the applicable systems. This is because all hosts will all be set to the same path and certificate.
- If you’re using unique certificates, you cannot put those parameters or the certificates in an app. This is because you can only provide one value to the parameter and each server will have a different certificate and a different path to that certificate. You must set
serverCert/clientCertlocally on the system and also place the certificate locally. It is possible to deploy those two parameters if you set the value to something that is not inside of the app itself, for example,$SPLUNK_HOME/etc/auth/server_cert.pem. You will still need to place the certificate file there locally.
When this guide refers to creating an app (for example, "Create an app folder called000_enterprise_tls") this isn't meant literally in the sense of creating an app on a system. You should be using the appropriate deployment mechanism for your environment, for example DS, CM, SHCD, or a third-party tool. If there is no deployment mechanism or you can’t deploy because the certificates are unique, then create the app locally. The important thing is that the right app, with the proper file paths, and the proper certificates end up on the system somehow. Even systems such as your DS and CM need outputs configuration to forward internal logs.
If you are required to use a passphrase on your private keys, sslPassword needs to be set in $SPLUNK_HOME/etc/system/local/server.conf and cannot be handled within an app. This is specifically for the sslPassword set under sslConfig of server.conf. Additionally, you cannot have a passphrase on the private key of a client if you set up requireClientCert=true on a remote server, as the remote host will refuse to communicate with the client. For example, the deployment server will refuse to communicate with a universal forwarder. Enterprise systems will not be able to start up their web service, because Splunk Web is a client of Splunkd. Keep in mind that adding a passphrase greatly complicates administration of TLS (and again, doesn't work with requireClientCert) and anyone who has access to view the private key most likely also has access to decrypt the passphrase using splunkd and therefore access the private key anyway.
You can change any app or file names used within this process. The names used here are suggestions and not requirements. You are responsible for understanding app name precedence.
Finally, if you use the Splunk UI to install apps or check for app updates, you'll also need to append the contents of $SPLUNK_HOME/etc/auth/appsCA.pem to your CA bundle used for sslRootCAPath.
2. Validate your certificates and files
Before you proceed with any TLS implementation, it is critical to perform the following verification to ensure you have the correct certificates and that everything is valid. If something fails at any one of these steps, do not proceed. Go back to the relevant areas of this guide and make changes to ensure that failures do not occur before you move ahead.
- View the certificates. Check that the CN/SAN looks right and that the certificate has the appropriate before/after. Do this for leaf and CA certificates.
- Verify that the private key and certificate match for every
client/serverCertyou will put in place. - Combine your certificates and keys into the appropriate files.
- Validate the certificate chain.
3. Set up TLS on Splunk Enterprise servers
To complete this process, you must have validated your certificates and files, reviewed the process notes, and have all necessary certificates and private keys.
There is no TLS verification enabled by default in Splunk platform. For the first phase of setup, only put certificates in place for Splunkd and Splunkweb. Do not enable verification until after TLS certificates have been deployed everywhere and you’ve verified Splunk is functioning as expected.
- Create an app folder called
000_enterprise_tls. Create acertsandlocalfolder within this newly created folder. - Combine the server certificate and private key into a single file and place it inside
000_enterprise_tls/certs/server_cert.pem. Do not include the root/intermediates in this file, there should be only two blocks of text in this file. The private key goes below the server certificate. - Place the private key into a single file and place it inside
000_enterprise_tls/certs/server_cert.key. - Combine your root and intermediate certificates and place it inside
000_enterprise_tls/certs/ca_certs.pemwith intermediates at the top, and roots at the bottom. - In
000_enterprise_tls/local/server.conf, set the following:[sslConfig] serverCert= $SPLUNK_HOME/etc/apps/000_enterprise_tls/certs/server_cert.pem sslRootCAPath = $SPLUNK_HOME/etc/apps/000_enterprise_tls/certs/ca_certs.pem
- In
000_enterprise_tls/local/web.conf, set the following:[settings] enableSplunkWebSSL = true serverCert= /opt/splunk/etc/apps/000_enterprise_tls/certs/server_cert.pem privKeyPath = /opt/splunk/etc/apps/000_enterprise_tls/certs/server_cert.key
Do not use
$SPLUNK_HOMEinweb.conf. You must use an absolute path and change accordingly. - Restart the Splunk platform. Validate that you’re able to get to the web UI and log in.
- If you don’t receive a 500 error when logging into Splunk Web then your syntax is correct.
- If you do see an error, then there’s an issue with one of the steps above. Look for
X509VerifyandSSLCommonmessages in thesplunkd.logfor more detail.
For more information, see Splunk Help: Configure Splunk Web to use TLS certificates and Configure TLS certificates for inter-Splunk communication.
4. Set up TLS on universal forwarders
To complete this process, you must have validated your certificates and files, reviewed the process notes, and have all necessary certificates and private keys.
For the universal forwarders, you should use a deployment server or some centralized tool such as Ansible or SCCM since they all use the same configuration. This initial setup does secure the universal forwarders. It is only a prerequisite for additional security that will be enabled later.
Universal forwarder testing steps
- Pick a universal forwarder that you can test with, ideally one that you have access to and isn’t a critical data source.
- Create an app folder called
000_uf_tls. Create acertsandlocalfolder within this newly created folder. - (Optional - Only do this if you plan to use
requireClientCert=trueon your intermediate/indexer tier OR Deployment Server later.) Combine the forwarder certificate (your generic server certificate strictly for universal forwarders) and private key into a single file and place it inside000_uf_tls/certs/forwarder_cert.pem. Do not include the root/intermediates in this file. There should be only two blocks of text in this file. The private key goes below the forwarder certificate. - Combine your root and intermediate certificates and place it inside
000_uf_tls/certs/ca_certs.pem. You should already have this file from setting up TLS on Splunk Enterprise, copy it. - In
000_uf_tls/local/server.conf, set the following. If you are using a passphrase on the private key, you must put thesslPasswordvalue in$SPLUNK_HOME/etc/system/local/server.confas there will always be a value in here and it will take precedence over what you set in this app. For this reason, it’s unlikely you will be able to successfully manage this without the use of third party tools such as Ansible or SCCM.Only set serverCert here if you will use
requireClientCert=trueon your deployment server.[sslConfig] sslRootCAPath = $SPLUNK_HOME/etc/apps/000_uf_tls/certs/ca_certs.pem serverCert= $SPLUNK_HOME/etc/apps/000_uf_tls/certs/forwarder_cert.pem
- Restart the universal forwarders, wait a few minutes and see if it’s able to connect properly to the deployment server and forward logs. If it’s not connecting, look for
X509VerifyandSSLCommonmessages in thesplunkd.logon the universal forwarder as this will tell you what the issue is. Do not proceed until this is resolved and working.
Deployment apps setup steps
- Now that you have a working app package on your test universal forwarder, copy
000_uf_tlsover to the deployment server in$SPLUNK_HOME/etc/deployment-apps. - Add the app to a serverclass that gets distributed to a small number of clients, and sure the app is set to
Restart Splunkd. - After you’ve confirmed it worked as expected when deployed from the deployment server, you can now deploy the
000_uf_tlsapp to all universal forwarder clients. A useful search you can use is:index=_internal sourcetype=splunkd component=DeployedApplication 000_uf_tls
Do not deploy this configuration to your Splunk Enterprise systems.
5. Set up TLS for Splunk to Splunk receiving/forwarding
To complete this process, you must have Set up TLS on Splunk Enterprise servers and Set up TLS on universal forwarders.
Check the architecture diagrams for FWD > IDX and FWD > IFWD > IDX.
You cannot use the same port for TLS and non-TLS simultaneously. You must decide if you will cutover everything at once (re-use the existing port) or run a new port for TLS so that you can stage/test and minimize outages. A new port may require network changes, so plan accordingly.
This setup is the minimum needed to turn on TLS data forwarding. Verification settings will be implemented in a later phase.
Receiver (IF / IDX) setup
- On your receivers, create or deploy an app folder called
100_splunk_receiving_tls. - Create a
localfolder within this newly created folder. - Place the following configuration into
100_splunk_receiving_tls/local/inputs.conf.[splunktcp-ssl:9996] disabled = 0 [SSL] serverCert= $SPLUNK_HOME/etc/apps/000_enterprise_tls/certs/server_cert.pem sslPassword =
- Restart Splunk platform on your receiver(s).
- If you are keeping the same port that you used for non-TLS, consider staging the rest of the sections below before you restart in order to minimize downtime.
For more information, see Configure Splunk indexing and forwarding to use TLS certificates.
Intermediate forwarder outputs setup (if applicable)
- On your intermediate forwarders, create an app folder called
100_splunk_intermediateforwarding_tls. Create alocalfolder within this newly created folder. - Modify and place the following configuration into
100_splunk_intermediateforwarding_tls/local/outputs.conf.useClientSSLCompression = trueisn’t a requirement, but it is generally recommended. If you value CPU more than network bandwidth, set it tofalse.[indexAndForward] index = false [tcpout] defaultGroup = primary_indexers [tcpout:primary_indexers] server = idx1:9996, idx2:9996 clientCert= $SPLUNK_HOME/etc/apps/000_enterprise_tls/certs/server_cert.pem sslPassword = useClientSSLCompression = true [tcpout-server://idx1:9996] [tcpout-server://idx2:9996]
- Restart Splunk platform and verify that your indexers are receiving internal logs from the intermediate forwarders. You can use the search:
index=_internal sourcetype=splunkd component=Tcp*put*.
Test forwarder setup
- On your test universal forwarder, create an app folder called
000_splunk_forwarding_tls. Create acertsandlocalfolder within this newly created folder. - (Optional - Only do this if you plan to use
requireClientCert=trueon your intermediate/indexer tier later.) Place the sameforwarder_cert.pemthat you used earlier for the universal forwarder setup steps inside the certs folder. - Modify and place the following configuration into
000_splunk_forwarding_tls/local/outputs.conf.[indexAndForward] index = false [tcpout] defaultGroup = primary_indexers [tcpout:primary_indexers] server = idx1:9996, idx2:9996 # clientCert is only set if you need to configure requireClientCert=true on intermediate/indexer tier. # clientCert= $SPLUNK_HOME/etc/apps/000_splunk_forwarding_tls/certs/forwarder_cert.pem useSSL = true sslPassword = useClientSSLCompression = true [tcpout-server://idx1:9996] [tcpout-server://idx2:9996]
useClientSSLCompression = trueisn’t a requirement, but it is generally recommended. If you value CPU more than network bandwidth, turn it off. - Restart Splunk platform and verify that logs are being received as expected from this system. You can use the search:
index=_internal sourcetype=splunkd component=Tcp*put*
Deployment server setup
- Now that you have a working app package on your test universal forwarder, copy
000_splunk_forwarding_tlsover to the deployment server inside$SPLUNK_HOME/etc/deployment-apps. - Add the app to a serverclass that gets distributed to a small number of clients, make sure the app is set to
Restart Splunkd. - After you’ve confirmed that it works as expected when deployed from the deployment server, you can now deploy the
000_splunk_forwarding_tlsapp to all clients (universal forwarder and Enterprise).
Enable TLS verification
Deployment server connections
Check the architecture diagram for deployment server connections.
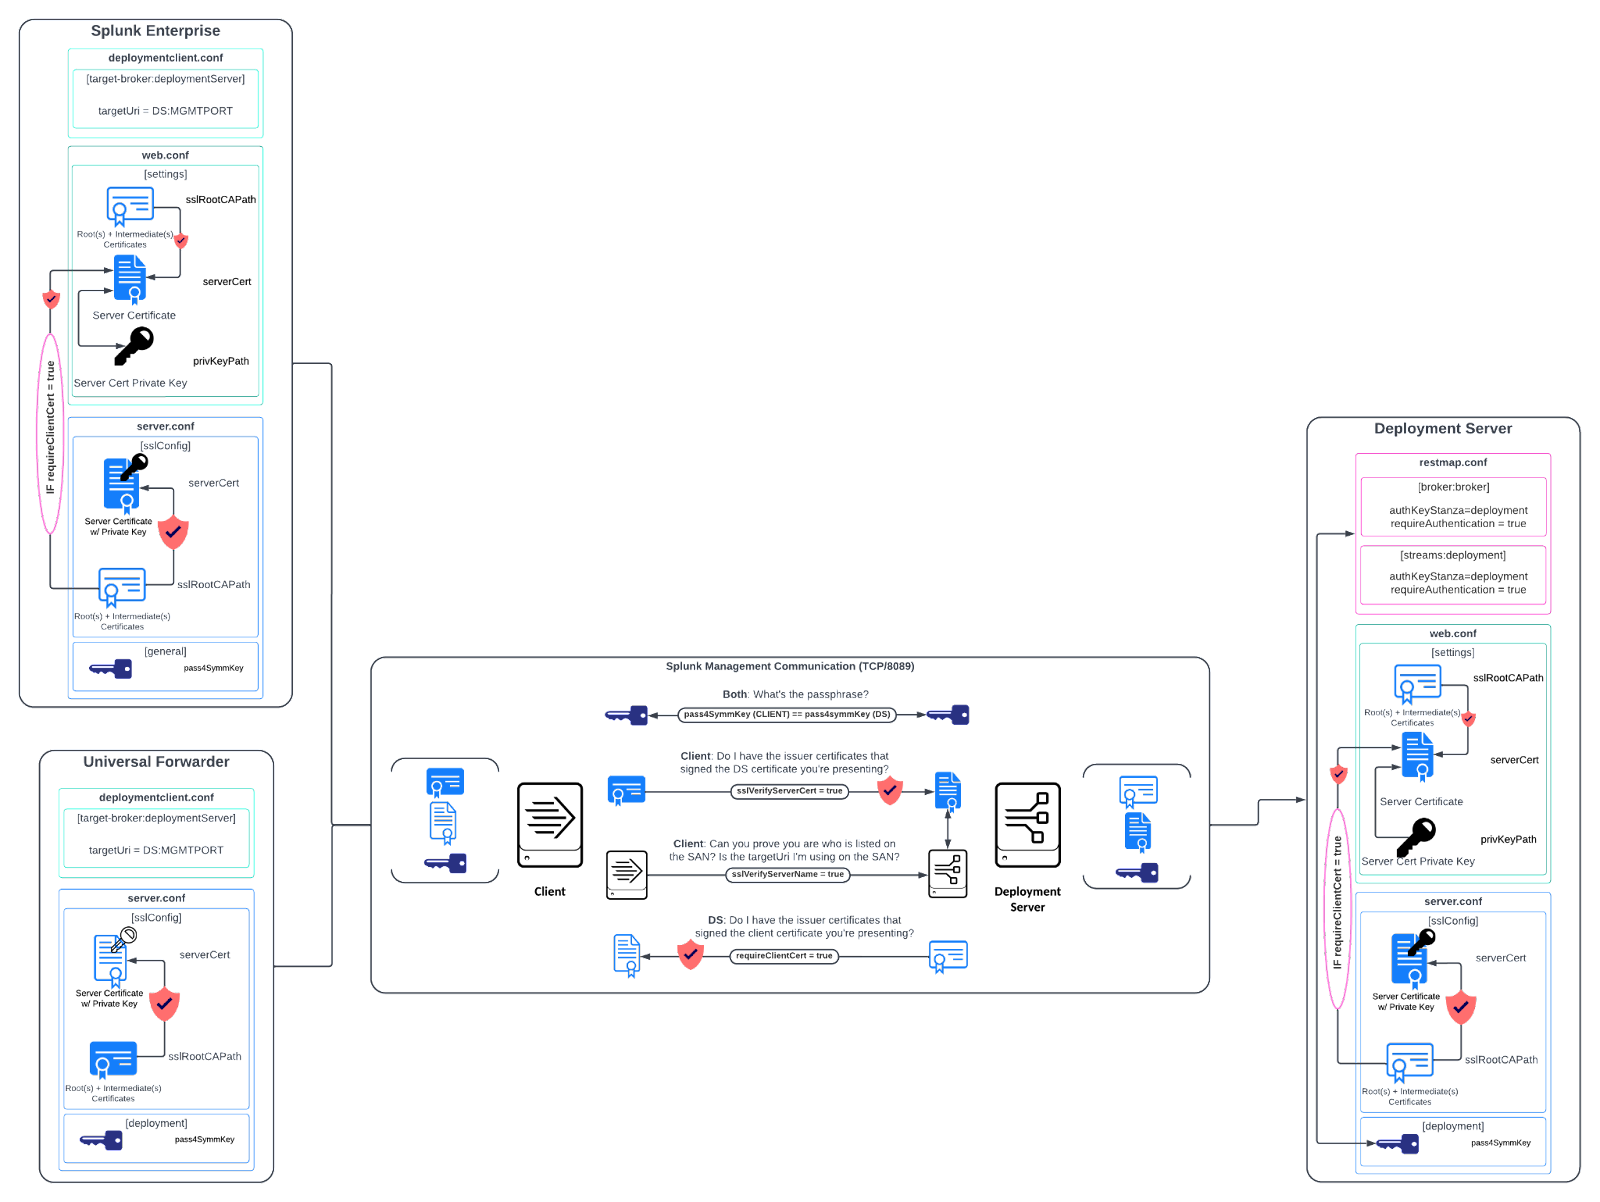
To complete this process, you must have Set up TLS on Splunk Enterprise servers and Set up TLS on universal forwarders.
Universal forwarder testing steps
- Pick a universal forwarder that you can test with, ideally one that you have access to and that isn’t a critical data source.
- In
000_uf_tls/local/server.conf, add the verify parameters to the existingsslConfigstanza.[sslConfig] sslRootCAPath = $SPLUNK_HOME/etc/apps/000_uf_tls/certs/ca_certs.pem serverCert= $SPLUNK_HOME/etc/apps/000_uf_tls/certs/forwarder_cert.pem sslVerifyServerCert= true sslVerifyServerName = true
Note that
sslVerifyServername = trueonly works on Splunk Enterprise 9.0+. - Restart the universal forwarder, wait a few minutes and check it connects properly to the deployment server. If it’s not connecting, look for
X509VerifyandSSLCommonmessages in thesplunkd.logon the universal forwarder, as this will tell you what the issue is. Do not proceed until this is resolved and working.
Deployment apps setup steps
- Log into the GUI of the deployment server and check that the universal forwarders are connecting properly (Settings > Forwarder Management). Take note of the amount of clients.
- Copy
000_uf_tlsover to the deployment server in$SPLUNK_HOME/etc/deployment-apps. - Reload the serverclass(es) containing
000_uf_tls(splunk reload deploy-server -class name_here) or restart the deployment server to reload all serverclasses. - Log in to the GUI of the deployment server and check that universal forwarders are connecting properly (Settings > Forwarder Management). Compare the number of clients to the previous number (remember, there is a check in time, it won't be immediate). You can use the search:
index=_internal sourcetype=splunkd component=DeployedApplication 000_uf_tls
Deployment server setup steps
Do not proceed with this section if you are using a passphrase on the universal forwarder certificate or the deployment server certificate.
- Log into the GUI of the deployment server and check that the universal forwarders are connecting properly (Settings > Forwarder Management). Take note of the number of clients.
- On your deployment server in
etc/apps/000_enterprise_tls/local/server.conf, add the new parameter to the existingsslConfigstanza:[sslConfig] serverCert= $SPLUNK_HOME/etc/apps/000_enterprise_tls/certs/server_cert.pem sslRootCAPath = $SPLUNK_HOME/etc/apps/000_enterprise_tls/certs/ca_certs.pem requireClientCert= true
- Restart Splunk platform.
- Log in to the GUI of the deployment server and check that universal forwarders are connecting properly (Settings > Forwarder Management). Compare the number of clients to the previous number (remember there is a check in time, it won't be immediate).
TLS forwarding
To complete this process, you must have Set up TLS for Splunk to Splunk receiving/forwarding.
Receiver (IF / IDX) adjustments
- Adjust
100_splunk_receiving_tls/local/inputs.confwith these new additions (don't remake the stanza):[SSL] sslVersions = "tls1.2" requireClientCert= true
- Restart Splunk platform on the receiver.
- Ensure that data is still coming in. If it stops working, set
requireClientCert= falseand fix your certificate files – thesslRootCAPathyou have on the receiver does not trust the certificate being presented by clientCert ofinputs.confon the forwarder. You can use the search:index=_internal sourcetype=splunkd component=Tcp*put* log_level=ERROR
Test forwarder adjustments
- Adjust
000_splunk_forwarding_tls/local/outputs.confwith these new additions (don't remake the stanza):[tcpout:primary_indexers] sslVerifyServerCert= true sslVersions = "tls1.2"
- Restart Splunk platform on the forwarder.
- Ensure that data is still coming in. If it stops working, set
sslVerifyServerCert= falseand fix your certificate files – thesslRootCAPathyou have on the forwarder does not trust the certificate being presented byserverCertofinputs.confon the receiver. You can use the search:index=_internal sourcetype=splunkd component=Tcp*put* log_level=ERROR
Deployment server setup steps
- Copy
000_splunk_forwarding_tlsover to the deployment server in$SPLUNK_HOME/etc/deployment-apps. - If you just made
000_uf_tls, repeat for that app as well. - Add the app to a serverclass that gets distributed to a small number of clients, make sure the app is set to
Restart Splunkd. - After you’ve confirmed that it works as expected when deployed from the deployment server, you can now deploy the
000_splunk_forwarding_tlsapp to all clients. You should also deploy000_splunk_forwarding_tlsto your Splunk Enterprise servers but not to the receivers themselves.
Do not deploy 000_uf_tls to your Splunk Enterprise servers.
For more information, see Secure deployment servers and clients using certificate authentication.
Splunkbase apps connection
If you have configured sslRootCAPath as this document has outlined, you should also be aware that this will break the “Browse More Apps” and app update checking feature in the UI. In order to resolve this, append $SPLUNK_HOME/etc/auth/appsCA.pem to your configured sslRootCAPath file. If you do not use the Splunkbase connection, this step is not required for you.
Common TLS troubleshooting
Connection with OpenSSL hangs
If openssl s_client hangs before it can report anything about certificates, there’s a problem with the TLS server. In most instances, this is because the sslPassword doesn’t match the one that was used to generate the key. Check this first. The splunkd.log will say something like this:
07-15-2022 22:41:26.142 +0000 ERROR SSLCommon [18692 HTTPDispatch] - Can't read key file /opt/splunk/etc/apps/mgmt_secure_server/auth/octopus_sh-mgmt_server.pem SSL error code=101077092 message="error:06065064:digital envelope routines:EVP_DecryptFinal_ex:bad decrypt"
Unable to get local issuer
This warning message indicates that the TLS client (in this case, OpenSSL) couldn't identify who issued the certificate. That means that the CA identified in the certificate is unknown. If you get this message in Splunk platform, you’re most likely missing the appropriate root/intermediate certificates in the sslRootCAPath. However, if you’re seeing this with the openssl command, you likely need to pass the -CAFile argument:
# openssl s_client -connect 12.23.45.6:8000 -quiet -CAfile $SPLUNK_HOME/etc/auth/cacert.pem.default
depth=1 C = US, ST = CA, L = San Francisco, O = Splunk, CN = SplunkCommonCA, emailAddress = support@splunk.com
verify return:1
depth=0 CN = cm.so.splunklabs.net, O = SplunkUser
verify return:1
Self-signed certificate in chain
As part of the output from an attempt to openssl s_client, this message indicates that one of the certificates within the chain is self-signed. That is, the subject of the certificate is the same as the issuer. In order for OpenSSL to validate this, the self-signed certificate must be explicitly trusted by using the -CAfile option. The equivalent in Splunk platform would be adding this to the sslRootCAPath.
Certificate chain
 0 s:/C=US/ST=California/L=San Francisco/O=Splunk Inc/OU=Cloudworks/CN=*.cloud-architects.splunkcloud.com
   i:/C=US/ST=California/L=San Francisco/O=Splunk Inc/OU=Cloudworks/CN=Splunk Cloud Certificate Authority
 1 s:/C=US/ST=California/L=San Francisco/O=Splunk Inc/OU=Cloudworks/CN=Splunk Cloud Certificate Authority
   i:/C=US/ST=California/L=San Francisco/O=Splunk Inc/OU=Cloudworks/CN=Splunk Cloud Certificate Authority
Lines 4-5 show that the signing certificate (the issuer) for the leaf certificate on line 2, has the same subject as issuer, indicating that this is a self-signed certificate.
Key values mismatch
This message occurs when the private key for a certificate doesn’t match the certificate itself. It can occur most frequently with a misconfiguration (for example, the wrong key file is configured), but could be a problem with the certificate generation process. The underlying principle here is that the public side of the key is algorithmically linked to the private key that the server has. If the math doesn’t work, then it’s the wrong key. The openssl command can be used to validate the keys of a certificate / key pair:
openssl x509 -noout -modulus -in <CERTIFICATE> | openssl md5
openssl rsa -noout -modulus -in <PRIVATE_KEY> | openssl md5
Next steps
These resources might help you understand and implement this guidance: