Configuring Splunk DB Connect
This guide provides instructions for smooth configuration and avoiding common pitfalls when setting up the different components required to use Splunk DB Connect. Splunk DB Connect (DBX) is a tool that enables the Splunk platform to communicate with relational databases.
The step-by-step instructions detailed here show the setup of Splunk DB Connect in Linux with Microsoft SQL Server 2022 on Windows 2022, using a SQL Server-native user to read data from the database (although previous versions of this article have worked with DB Connect on Splunk platform 9.0). This example model is shown since many customers run on Linux, and SQLServer is a popular database.
These instructions are designed to be used in conjunction with the guidance on working with DB Connect on Splunk Docs. The procedure shown here includes some cautions that can trip you up if you're not aware of them.
Splunk DB Connect supports a number of popular databases databases out-of-the-box. However, if you can find a JDBC driver for an unsupported database then it is possible Splunk DB Connect can work with it. You might need to undertake extra configuration to get it implemented, which Somerford Associates, the author of this article, can help with.
Prerequisites
Before installing Splunk DB Connect, it is important to consider the following:
- Splunk Enterprise version. Splunk DB Connect v3.6.0 is compatible with Splunk Enterprise 7.2.0 and above, while later versions of Splunk DB Connect only support Splunk Enterprise 8.1 and above due to the version of Python available. If you are a Splunk Cloud Platform customer, then you need Splunk DB Connect version 3.7.0 or above. At the time of writing, we're using Splunk Enterprise 9.2.1 with Splunk DBConnect 3.18.0.
- Installation location. Splunk DB Connect can be installed on a heavy forwarder or a search head.
Like all Splunk systems, although it is possible to install DB Connect in an indexer, it is strongly discouraged for a few reasons: DB Connect can be very heavy on resources and you should avoid placing extra load on an indexer. DB Connect requires SplunkWeb, and running SplunkWeb on an indexer increases its load. Finally, running DB Connect on indexers in a cluster could create duplicated data and uneven load on the cluster.
- OS and version being used. Splunk DB Connect can be installed on Windows or Unix/Linux as long as Splunk Enterprise supports the installation of a heavy forwarder there.
- Ports. The correct ports need to be opened between the Splunk DB Connect Splunk platform instance and the database server. For instance, Microsoft SQL Server’s default is 1433 and Oracle’s is 1521.
- Connection configuration for the database. You'll need to configure the correct type - for example, SQL Server allows for domain user authentication or DB-internal and name of instance or default instance. You'll also need to select the right listener details on the required resources, as appropriate for your environment.
- User configuration. Users need to be created with appropriate privileges to connect to the database. For example, if you want to read the data from a table/view into Splunk Enterprise, then users need read-only access to the table or view. If they need to output data from the Splunk platform to the database, then they need to have insert/update access on the required resources.
- Database receiving connections. Check that the database can receive connections from the computer that the Splunk platform is running on.
It is recommended to use another tool such as TOAD for Oracle or Microsoft SQL Server Management Studio to connect to the database as the proposed user to ensure that the connection is possible. Make sure that TCP/IP Client Protocol is enabled in the SQL Server Configuration Manager, so that this can be used for connection from the Splunk server.
- Splunk Deployment Server compatibility. Splunk DB Connect does not support Splunk Deployment Server, and it is not possible to install it on a universal forwarder as it requires SplunkWeb and Python to run.
- Splunk DB Connect compatibility. Splunk Cloud Platform supports Splunk DB Connect on the search head, but there is no support for the dbxquery command. In most cases, you will not want to open a port from Splunk Cloud Platform to your database systems, so installing Splunk DB Connect in on-premises Splunk Enterprise heavy forwarders and then indexing the data up to Splunk Cloud Platform is the preferable method.
- Authentication. When using SQL Server, SQL Server authentication is recommended if the Splunk Enterprise instance is on Linux, but Windows authentication is advised if the Splunk Enterprise instance is on Windows, although SQL Server authentication can also be used in that case.
- KVStore. For versions of DBConnect 3.10.0 and above, the KVStore must be running and healthy on the instance that DBConnect is running, as DBConnect uses the KVStore for its operation.
- Folder Access. Ensure that the user that is running Splunk Enterprise (and therefore Splunk DB Connect) has full write access to the Splunk/var and Splunk/etc/apps/splunk_app_db_connect folders.
Components
The following are the necessary components required for setting up Splunk DB Connect:
- Splunk DB Connect. Download this app from Splunkbase and review the release notes on Splunk Docs. It's recommended that you download the latest version.
- Java Runtime Environment (JRE) or Java Development Kit (JDK). Download and install one of these. JDKs include a JRE and tools for Java development, such as compilers. JREs are the simplest component you'll need. Splunk provides a selection of JREs and JDKs for various operating systems. It's recommended to use OpenJRE, which is free and does not require licensing.
Be sure to take note of the version of JRE/JDK that you are installing and make sure that it is supported. Current supported versions include 11, 17, and 21, but versions 22 and later are not supported. See Deploy and use Splunk DB Connect for more information.
- Java Database Connectivity (JDBC) database driver. This is a Java library (.JAR file) used by Splunk DB Connect in the JRE to access the database. You can find a page with links to pre-packaged drivers for supported databases here. It is recommended to download the appropriate driver for your database from this source, as it can be challenging to find the correct version of the driver otherwise. For this example process, the SQL Server driver used can be downloaded from this Splunkbase page.
Creating a connection
The overall process for creating a connection on Splunk Enterprise is as follows:
- Install the JVM and make sure that the JAVA_HOME and PATH are set up.
- Install Splunk DB Connect.
- Install the DB Driver.
- Configure Splunk DB Connect with Identities and Connections.
- Test.
The overall process for creating a connection on Splunk Cloud Platform is as follows:
- Ask Splunk Cloud Platform support to install Splunk DB Connect, which should include a JRE and probably all of the drivers (depending on the request).
- Install the DB Driver (if not already installed by Splunk Cloud Platform support).
- Configure Splunk DB Connect with Identities and Connections.
- Test.
Detailed process
If you are working with Splunk Enterprise, then start with step 1 in this section. If you are using Splunk Cloud Platform Classic Experience, then you will need to ask Splunk Cloud Platform support to install the Java Virtual Machine and Splunk DB Connect, and then proceed to step 8 in this section. If you are using Splunk Cloud Platform Victoria Experience, then Splunk has already installed the Java Virtual Machine, so you can install Splunk DB Connect from Splunkbase directly on Splunk Cloud Platform and you can proceed to step 7 in this section.
- Splunk DB Connect is a large app and if your connection is slow, this may take some time. You might find that there are some timeouts on the upload but the process will still work. You might need to upload from a more local area to improve this process.
- The installation requires a restart of the Splunk instance. Restart your Splunk platform when prompted and do not skip the restart, as this can cause problems later.
.png?revision=1)
-
Install the JRE or JDK on the Splunk Enterprise server. Here is an example script to install the driver on a CentOS Linux server:
tar xfvz /opt/openjdk-21.0.1_linux-x64_bin.tar.gz -C /opt
chown -R splunk:splunk /opt/jdk-21.0.1
chmod -R 700 /opt/jdk-21.0.1
- To make upgrades of Java easy, use the following command to make a link (alias) to the Java installation, so that JAVA_HOME can be defined once in Splunk DB Connect and then used there, even after an upgrade:
ln -s /opt/jdk-21.0.1 /opt/java
- Set up the JAVA_HOME in the OS environment and add it and the bin folder to the PATH, so that the Splunk Enterprise user can use it. This is critical, since most issues that are seen with installing Splunk DB Connect are because users can't find the Java installation and the Java bin directory. You can use the following commands in the .bashrc on the Splunk user:
export JAVA_HOME=/opt/java
export PATH="$JAVA_HOME/bin:$PATH"
If you are installing DB Connect on Windows Splunk, then install it as normal with an MSI. However, you should verify that the JAVA_HOME and PATH environment variables are set up in the system environment similar to the above, as the installer doesn’t always get it right.
- Install the Splunk Enterprise heavy forwarder. Make sure that it is functional and it is at least sending its internal logs to the indexers with a search such as
index=_* host=<SplunkHFName>. - Make sure that the Splunk user environment can get to Java, with this command:
/opt/splunk/bin/splunk cmd java -version
- The command should reply with something like:
openjdk version "21.0.1" 2023-10-17
OpenJDK Runtime Environment (build 21.0.1+12-29)
OpenJDK 64-Bit Server VM (build 21.0.1+12-29, mixed mode, sharing)
- Log into Splunk Enterprise and install the Splunk DB Connect app from Splunkbase. This is a simple upload installation via Splunk Web by going to Apps > Manage Apps > Install App from File, choose the file and click Upload.
Instead of installing via Splunk Web, you can install the app via the installation .tgz, but there is little advantage from doing it this way as you will still need to use the app in Splunk Web later.
- Install the JDBC driver as per the Java Database Connectivity (JDBC) database driver guidance detailed previously. The driver is just another app that is installed in Splunk platform and does not need a restart of Splunk to complete.
- Configure Splunk DB Connect to use Java by going to Apps > Splunk DB Connect > Configuration > Settings > Drivers. If you have installed the app, you should see the drivers indicated as installed. The example below shows the installed Microsoft SQL Server drivers, which in this case is just one .jar file:
.png?revision=1)
- Configure Splunk DB Connect to use the Java installation. In the Splunk DB Connect app, go to Configuration > Settings > General. If the user has picked up the
JAVA_HOMEenvironment variable, then you can see theJAVA_HOMEpath that you have set up, otherwise, set the JRE Path for your environment. Alongside this, you can see the Task Server JVM Options and the Query Server JVM Options. These options change as you set other parameters such as the Task and Query Server Ports, and as you use various logging levels in the the Logging parameters of the app..png?revision=1)
- Click Save. If you get a message about not being able to start the Task Server, check whether your parameters are correct.
If the JAVA_HOME and PATH are configured correctly, but the Task Server is still not running, then:
- Make sure that the SPLUNK_HOME variable is set in the splunk-launch.conf to the correct value (that is, the root of the Splunk folder (such as /opt/splunk or C:\Program Files\Splunk).
- Check the path in the customized.java.path files in all of the subfolders in the app are pointing to the java executable in the Java installation. - Next, set up the DB Connect Identity or Identities to connect to the DB Server. In the case of SQL Server, the user can be either SQL Server native or using Windows Integrated Authentication. In this example SQL Server authentication is shown, as Splunk Enterprise is running on Linux. To set up the user, go to Configuration > Settings > Identities, click New Identity and then select Basic Identity. Set up the user as shown in the screenshot below, then click Save
Alternatively, if you are using Windows authentication, then you will need to click the Use Windows Authentication button and add the authentication domain.
.png?revision=1)
Note that the Identity Name is a name that you will use in DB Connect for the Connections. The Username is the name of the user in the target database.
-
If you change to the Permissions tab, you can set the app context and the users who will be able to use this user in DB Connect:

By default, the admin user should have access, but you will need to give others access (if running on a search head).
- Create the connection using the identity that you have just created by going to Configuration > Settings > Connections and clicking New Connection, as seen in the screenshot below. You should ensure you:
Where the timezone is subject to Daylight Savings Time, use the city-based timezone and not the generic ones for that location, for example, Europe/London and not Etc/UTC, so that DST is obeyed.
.png?revision=1)
- Give the connection a recognizable name.
- Select the new identity.
- Select MS-SQL Server Using MS Generic Driver for the Connection Type. Alternatively, if you are using Windows Authentication, then use MS-SQL Server Using MS Generic Driver With Windows Authentication.
- Set the Timezone.
- Set the JDBC URL Settings, as shown in the screenshot below.
.png?revision=1)
- Set the FQDN of the Host. Although the FQDN of the SQL Server can be resolved in the operating system, Splunk DB Connect and JDBC might not resolve this, so instead, use the IP address of the server as shown below.
- Set the SQL Server port (default 1433) and Default Database. The Default Database is usually the database that you are going to use if the SQL does not specify the database name.
- Next, set the database properties.
- Unless you are using SSL for encryption, uncheck Enable SSL as encryption for connections to SQL Server databases is not enabled by default and requires certificates for setup. You will also need to add the
encrypt=falsesetting in the Connection Properties for SQL Server, asencrypt=trueis used implicitly if not disabled explicitly. - Under Connection Properties, if you are using a SQL Server named instance, then you need to specify the
InstanceNameparameter. - If you are using Windows Authentication with SQL Server, click Add Property and add
authenticationScheme=NTLM,integratedSecurity=trueand “domain” property (containing the name of the Windows domain).
-
Optionally, you can set the Advanced Settings. You can set the driver to only read the database by setting Read Only, but it is better for the identity to only be able to read from the database instead. You can also set the Fetch Size to a value other than 100, but Splunk DB Connect only retrieves that number of rows at a time to reduce load on the SQL Server and reduce the number of timeouts. (Incidentally, 300 is the default Fetch Size if not provided.)
.png?revision=1)
-
A further optional setting is to click Enable Connection Pool so that database connections are reused, which reduces the number of connections made to the server. You can find more information on this setting here. Clicking Enable Local Timezone Conversion is used to allow dates and times to be converted to the local time zone. You can find more information on this setting here.

- Click the Save button in the top right corner to validate the connection and save it. If there is a problem with the connection, then you'll see an error message.
Creating an input
- In the Splunk DB Connect app, go to Data Lab > Inputs and click New Input to go to the New Input screen.
- Select the Connection to use. In this case, SQLServer is used.
- Select the Catalog dropdown to choose the database to work with.
- Select the Schema. This is variable, but many applications use the “dbo” schema.
- Select the Table to read from. This triggers the Splunk platform to read the database table and display the contents. This screenshot shows two demonstration rows:
.png?revision=1)
- If you already have a SQL query, you can insert it into the SQL Editor panel and make edits.
- Click the Execute SQL button.
You must do this after, and not before, any edits you make in the SQL Editor, otherwise you will not be able to progress to the next stage.
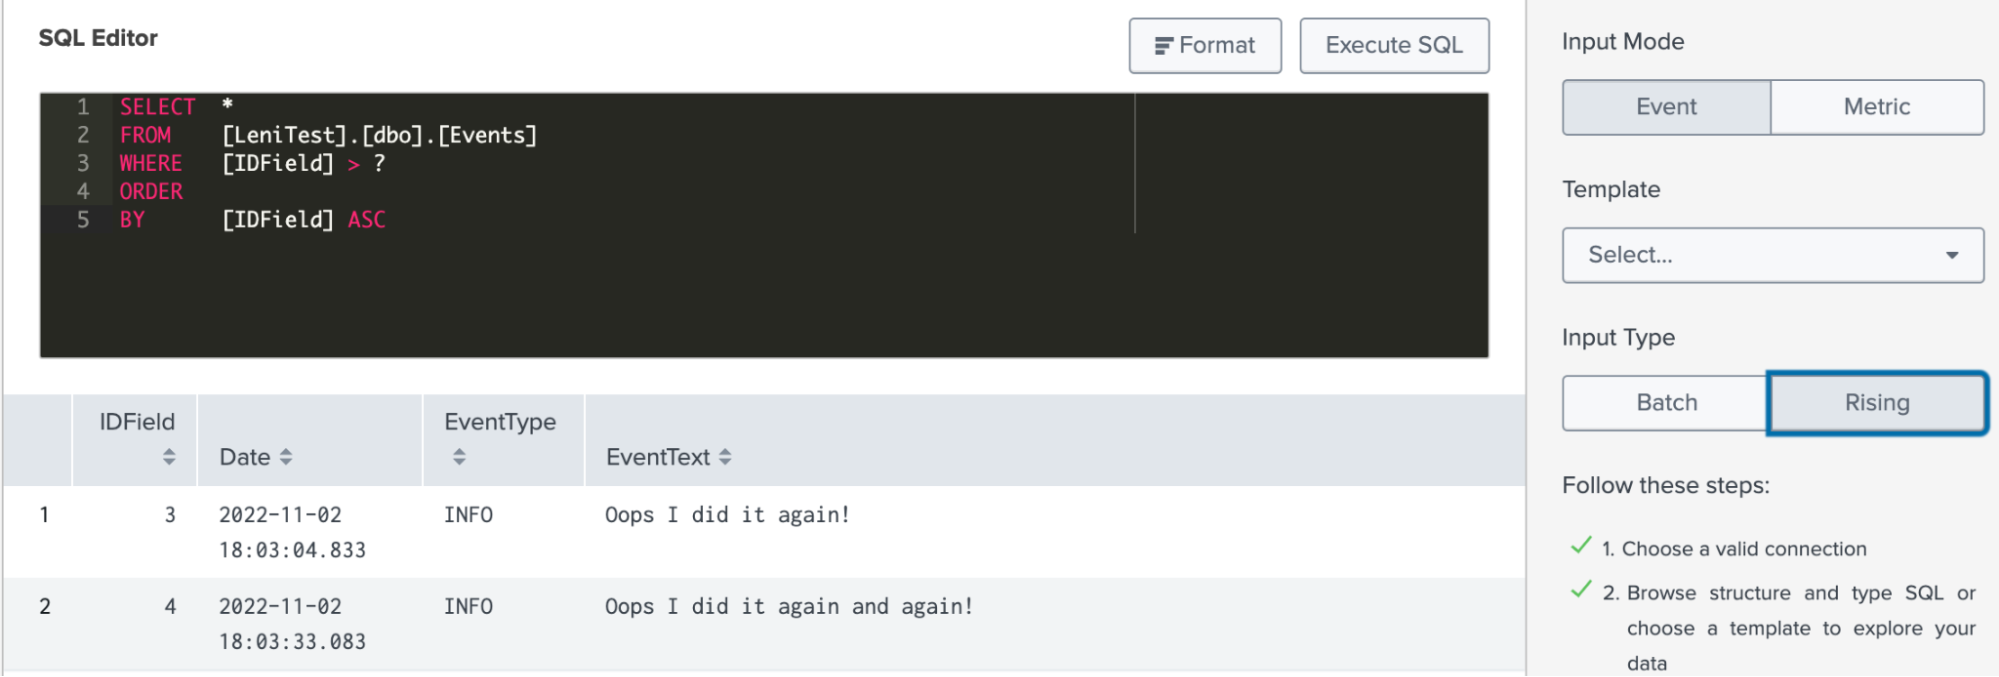
- To the right side of the SQL Editor, as shown in the screenshot above, select the Input Mode. This is usually “Event” for results with any non-numeric values.
- Select the Input Type, either “Batch” or “Rising”.
- For Batch, you are importing all of the rows in a table within a time period. In the example shown in the screenshot under step 5, “Batch” is used. In the SQL, make sure that when the SQL is run, it captures only the data that is present in the table, indexed on the date (as shown in the example, where only yesterday’s data is being queried).
- For Rising, there needs to be a rising column such as the IDField shown in the step 1. For the Rising input type, ensure that the SQL looks like the screenshot below. Here, the question mark is substituted with the value in the Checkpoint and Splunk keeps a record of the latest checkpoint value when it runs the SQL query.
Make sure that you include a filter which includes the “?”. In this example, the Rising Column is set to “IDField” and Checkpoint Value as 0 to get this output. If you set the Checkpoint Value to be 3, then you would only have the single IDField = 4 row, and Splunk platform will start running the input from line 4.
- Set the Timestamp. The best way to do this is by importing the date in a field and selecting which one to use. If there is no suitable date field, then you can use the Current Index time.
- Change the Query Timeout, as shown in the screenshot below.
Some databases can be subject to lag and performance issues under extreme circumstances, so increasing the default value of 30 seconds to a higher value, such as 120, is recommended.
.png?revision=1)
- Click Next. Give the output a name, an optional description, and select the Application, as shown in the screenshot below. When running on a heavy forwarder, you should keep the output in the Splunk DB Connect app so that the inputs are kept in one app. When running on a search head, the output can be placed into other apps so that they can be retained in the other app’s security context.
.png?revision=1)
- Add the Parameter Settings, as shown in the screenshot below.
- The Max Rows to Retrieve can be used to limit the number of rows imported with each query. You should leave this at 0 (unlimited) in most cases. If an input is taking in too much data at a time, then you can set a limit.
- The Fetch Size is by default 300 and that means that the data is brought back to the Splunk platform in pages of up to 300, which are then imported into the Splunk platform. This can be bulky, in the case of a long low, so if there are performance issues on the Splunk server, this can be reduced or increased (conversely if you want to speed up the execution).
- The Execution Frequency can be set in crontab format (in the screenshot below, this input runs on the hour, every hour of every day) or in the form of a number of seconds.
.png?revision=1&size=bestfit&width=540)
- Set up the Metadata, as shown in the screenshot below. Host and Source are optional, but Source Type and Index are not.
.png?revision=1)
- Set the “Host” to be the name of the SQL Server machine, rather than the host that is running Splunk platform (which is the default), as this provides better indication of where the data is originating from.
- Do not use built-in source types. Create a new one, so that any fields that are created for this source can be assigned only to this source and not to other sources.
- Always assign an index and do not use the main/default index. This is because the main index is a default index for data that has nowhere else to go because the input/props/transforms is incorrectly configured. Also, if you place data in the main/default index, access to the data in that index might be mixed in with data from other data sources. Since access to data is run on a per-index basis, you will see both good and bad data, thus making your data results "dirty". Finally, if all data is placed into just the main/default index, you will either have access or not. There is no option to restrict general data from PII, HIPAA, or GDPR data sources, for example.
- Click Finish to complete your input.
- Now you can start searching for the data in the Splunk platform. Go to the Searching & Reporting app and run a search to see the data that has been brought in. Notice in the screenshot below that the data is in key-value pairs.
.png?revision=1)
Creating an output
Outputs need to run on a Splunk instance that has access to both the database and the indexers. This might be difficult in certain circumstances, so this needs to be fully considered when architecting these. Somerford Associates, the author of this article, can help with this.
In this example, the changes to the Splunk DB Connect configuration are output to a configuration tracker (which is a new feature that was introduced in version 9, so this section will not work in version 8 and below) to a database table called “DBConnectChanges” on the SQL Server database.
CREATE TABLE [dbo].[DBConnectChanges](
[eventtime] [datetime] NOT NULL,
[action] [nchar](10) NOT NULL,
[stanza] [nchar](255) NOT NULL,
[old_value] [nchar](1024) NULL,
[new_value] [nchar](1024) NULL
) ON [PRIMARY]
GO
.png?revision=1)
- Construct the table to receive the data with this SQL script.
Ensure that the table fields have the right data type for each output, such as datetime, not date, for instance. You'll also need to make sure that the table is completed before proceeding further, as you may need to restart the Splunk platform after the catalog of tables is ingested into Splunk DB Connect.
- Construct a search that creates the data that you needed to output to the table. Make sure that the fields output are in the right format for the database (see
eventtimeoutputting a SQLdatetimeformat, for instance).index="_configtracker" "data.path"="*/splunk/etc/apps/splunk_app_db_connect/local/*" | fields + data.action, data.changes{}.properties{}.new_value, data.changes{}.properties{}.old_value, data.changes{}.stanza, datetime | eval eventtime = strftime(strptime(datetime,"%m-%d-%Y %H:%M:%S.%3N %Z"), "%Y-%m-%dT%H:%M:%S") | rename data.action as action, data.changes{}.properties{}.new_value as new_value, data.changes{}.properties{}.old_value as old_value, data.changes{}.stanza as stanza | sort +eventtime | table eventtime, action, stanza, old_value, new_value - Open Splunk DB Connect, go to Data Lab > Outputs and click New Output.
- Add the search that you created above and make sure that you have data output, then click Next.
- Select the Connection, Catalog, Schema, and Table to output to.
Depending upon the speed and size of your environment, selection of the resources may take some time.
- Click Next to open the Fields Mapping screen.
- Map the fields in the search to the fields in the database.
- If your data has a key and there is a change that you will update as well as insert data, then select Enable Upsert and then select the column in the search as the key. As this example data is generated by
datetime, this isn't needed, so you can proceed to the next step..png?revision=1)
- Click Next. Here, give the output a name, an optional description, and select the Application.
- When running on a heavy forwarder, you should keep the output in the Splunk DB Connect app so that the inputs are kept in one app.
- When running on a search head, the output can be placed into other apps so that they can be retained in the other app’s security context.
.png?revision=1)
- Add the Parameter Settings. The default Query Timeout is 30 seconds and the Batch Size is 1000. If the output is to be run on schedule, then set it, using either the interval in seconds or a crontab expression.
.png?revision=1&size=bestfit&height=545)
- Click Finish to save the output.
- Wait for the output to run and then run a SQL command to look for the data:
.png?revision=1)
Next steps
If you need additional help with this guidance, UK-based Somerford Associates can help. Somerford Associates is an award winning Elite Partner with Splunk and the largest Partner Practice of Consultants in EMEA. We protect data, demonstrate that it is being managed effectively and derive greater value, by providing real-time insights to support effective decision making. With our specialist knowledge, skills, experience and strong reputation for enabling digital transformation at scale and at pace, we provide full delivery, including design, implementation, deployment and support.
In addition, these Splunk resources might help you understand and implement the recommendations in this article:
- Splunk Help: About Splunk DB Connect
- Splunk Help: How Splunk DB Connect works
- Splunk Help: Splunk DB Connect release notes
- Splunk Help: Create and manage database connections
- Splunk Help: Splunk DB Connect Prerequisites and Java runtime environment requirements
- JDK 18 Releases: https://jdk.java.net/18/
- Splunkbase: Splunk DBX Add-on for Microsoft SQL Server JDBC
The user- and community-generated information, content, data, text, graphics, images, videos, documents and other materials made available on Splunk Lantern is Community Content as provided in the terms and conditions of the Splunk Website Terms of Use, and it should not be implied that Splunk warrants, recommends, endorses or approves of any of the Community Content, nor is Splunk responsible for the availability or accuracy of such. Splunk specifically disclaims any liability and any actions resulting from your use of any information provided on Splunk Lantern.