Using ingest actions with source types that are renamed with props and transforms
Ingest actions 9.0 comes with two options to use sample data for previewing ruleset behavior:
- Upload your own data
- Use already indexed data
When using the indexed data to preview rules on the ingest actions UI, the preview runs a search on indexed data, which may lead you to believe that you are writing regex/eval rules against what the ingest-time data looks like.
However, when the ingest actions rulesets are deployed, those rulesets act on ingest-time data, which may be different from indexed data depending on what props/transforms are configured on the indexers. For example, if you are dealing with any data source that uses a source type rename in props/transforms on the same machine that you plan on using ingest actions, then this behavior may apply. This includes but is not limited to source types like syslog, XmlWinEventLog, and WinEventLog. This can result in a confusing experience when using the ingest actions UI preview.
How to use Splunk software for this use case
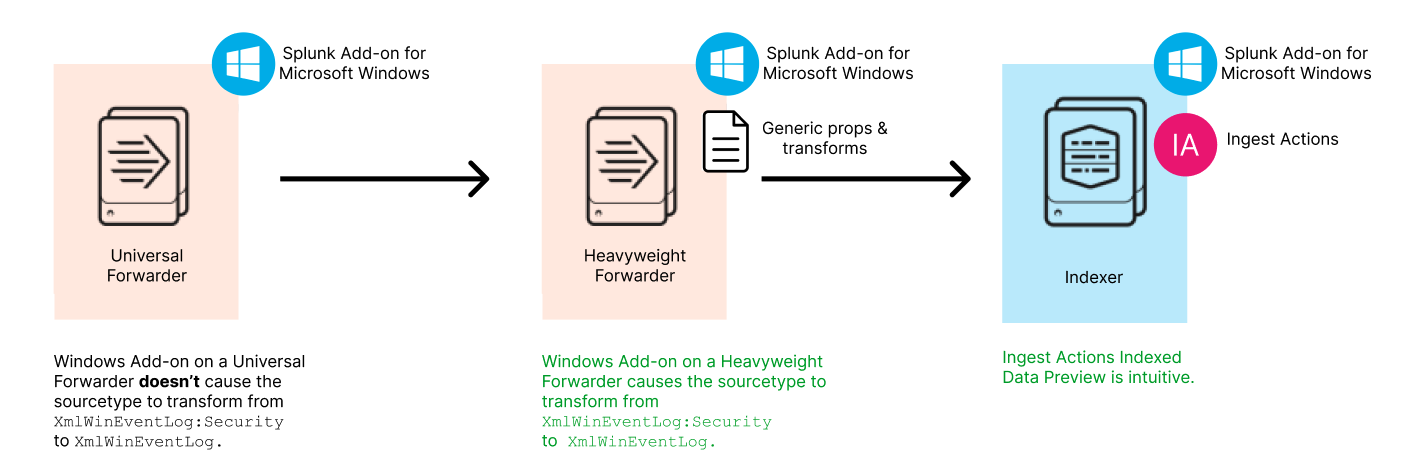
Example 1: A technical add-on (TA) renames a source type from something specific to something generic
You have two options for resolving this confusing experience when using the ingest actions UI preview:
- In the ingest actions UI preview, change the source type back to the original source type before saving and deploying the ruleset.
- Add a heavyweight forwarding layer which transforms all your data before hitting the indexing layer.
You can choose whatever option best suits your deployment architecture.
1. In the ingest actions UI preview, change the source type to the original source type before saving and deploying the ruleset.
In this example, the Splunk Add-on for Microsoft Windows is installed on a universal forwarder (UF) that sends to an indexer that also has the same technical add-on (TA) installed. The TA transforms a more specific “original” source type like XmlWinEventLog:Security or XmlWinEventLog:Application into the more generic XmlWinEventLog. The ingest actions UI preview may mislead you into believing the rulesets you’re writing will apply on the source type XmlWinEventLog, when they should actually be applied to the original source type XmlWinEventLog:Security.

To change the source type to the original source type before saving and deploying the ruleset, follow these steps:
- Ensure the Splunk Add-on for Microsoft Windows is installed on a universal forwarder and sending to an indexer that also has the same TA installed.
- Create a new ruleset and use
XmlWinEventLogas the source type for the preview.
- Add the rules that you want and verify that they work by looking at affected events. This example changes the index from
maintowin.
-
Go back to the screen in step 2 where you selected
XmlWinEventLogas the source type for the preview, and change it to the original source type. This example changes it back toXmlWinEventLog:Security. For the Splunk Add-on for Microsoft Windows specifically, if you look at the source of the previewed events you will see what the source type needs to be.
- After this ruleset is saved, make sure the changes are effective.

The situation encountered in steps 3 and 4 is not ideal from a usability perspective. If you want to be able to use the ingest actions UI preview seamlessly, making certain architectural choices can help significantly. It can help to deploy a heavyweight forwarding layer, which transforms all your data before hitting the indexing layer as described in the next section.
2. Add a heavyweight forwarding layer that transforms all your data before hitting the indexing layer.
Deploying a heavyweight forwarding layer, which transforms all your data before it hits the indexing layer, is a better solution than option 1 described above. Since the props and transforms are executed before events are routed to the indexing layer, what you see is what you get in the ingest actions UI preview.
To do this, follow these steps:
- Ensure the Splunk Add-on for Microsoft Windows is installed on a universal forwarder, heavy weight forwarder, and indexer.
- Create a new ruleset and use
XmlWinEventLogas the source type for the preview.
- Add the rules that you want and verify that they work by looking at affected events. This example changes the index from
maintowin.
- After this ruleset is saved, make sure the changes are effective.

Example 2: A technical add-on (TA) renames a source type from something generic to something specific 
The principles shown in example 1 also apply in situations where a TA renames an original source type from something more generic. You have the same two options to resolve this issue:
- In the ingest actions UI preview, change the source type back to the original source type before saving and deploying the ruleset.
- Add a heavyweight forwarding layer which transforms all your data before hitting the indexing layer.
As in the previous example, you can choose the option that best suits your deployment architecture.
1. In the ingest actions UI preview, change the source type back to the original source type before saving and deploying the ruleset.
In this example, the Splunk Add-on for Cisco ASA is installed on a universal forwarder which sends to an indexer that also has the same TA. The TA transforms a generic source type like syslog into the more specific cisco:asa. Because the transformations happen on the indexer prior to the ingest actions rulesets being applied, the ingest actions UI preview may mislead you into believing the rulesets you’re writing will apply on the source type cisco:asa, when they should actually be applied to the original source type syslog.

- Install the Splunk Add-on for Cisco ASA on a universal forwarder sending to an indexer that also has the same TA.
- Create a new ruleset and use
cisco:asaas the source type for the preview.
- Add the rules that you want and verify that they work by looking at affected events. This example uses the “Set Index” rule to change the index from
maintoasa3. - Go back to the screen where you selected
cisco:asaas the source type for the preview, and change it to the original source type. In this example, change it back tosyslog. - After this ruleset is saved, make sure the changes are effective.

Instead of using this method, it may be helpful instead for technical add-ons (TAs) and other props/transforms to execute their transformations on a separate node (such as a heavyweight forwarder) than the nodes with ingest actions rulesets deployed, as described in the next section. This can make your ingest actions UI preview experience more intuitive and prevent the need for you to investigate which source types were transformed.
2. Add a heavyweight forwarding layer which transforms all your data before hitting the indexing layer 
If you introduce a heavyweight forwarding tier into your environment to isolate any props and transforms before events are routed to the indexer, the ingest action UI preview will work seamlessly. Using a setup like the one below you can search by the source type cisco:asa in the ingest actions UI preview, write rules against that data stream, apply/save them, and expect the rule to function seamlessly.

More tips for situations where a technical add-on (TA) renames a source type from something generic to something specific 
Because TAs often change source types from something more generic (for example,syslog) to something more specific (e.g. pan:threat, pan:traffic, pan:audit), you might not want all your ingest actions rulesets to be applied to a syslog data stream.
In the example shown below using the Splunk Add-on for Palo Alto Networks, let’s assume you’re unable to deploy an intermediate heavyweight forwarder tier into your environment. You are okay with the workflows that don’t include a heavyweight forwarder shown in each of the examples used previously, and you only want to manipulate the data stream that will contain events with source type pan:threat. Although your ruleset will be written against source type syslog, you can use an eval statement like source type sourcetype == "pan:threat" to only manipulate that specific data stream.

How to determine if a TA or other props/transforms files might impact your “Indexed Data” preview UI 
To find out what TAs are deployed in your environment and what they do, you can investigate your props/transform files.
Search for search-time source type renames
- Log into the Splunk platform using the terminal (CLI).
- Run the command
splunk btool props list | grep rename.Any output returned should signal that search-time renamed source types exist. - Exec into the
props.conffile, and search forrename =.
- Locate the file stanza in which the
rename =line(s) exist. This file stanza name represents the original source type. In the example above, we know that the original source type wasWinEventLog:Applicationand that the renamed source type iswineventlog.
Search for index-time source type renames 
This example uses the Splunk Add-on for Microsoft Windows.
- Download the TA.
- Exec into the TA via the terminal (CLI).
- Search for
DEST_KEY =intransforms.conf.
-
Search for
sourcetypeto see which stanzas cause an index-time source type transformation.
-
In this case, continue with the renamed source type
wmi-sourcetype. It will be renamed based on theDEST_KEY=MetaData:SourcetypeandFORMAT = sourcetype::WMI:$1entries underneath the stanza. -
Exec into the
props.conffile of the TA and look for the stanza namewmi-sourcetype. The stanza underneath whichwmi-sourcetypesits is the original source type, so the original source type waswmi.
Next steps
These resources might help you get started with ingest actions:
- Splunk Blog: Ingest actions: data access when, where and how you need it
- Tech Talk: Introducing ingest actions: filter, mask, route, repeat
Thanks to Bryan Pluta, Staff Consulting Solution Engineer, and Samat Jain, Principal Software Engineer for their contributions to this article.