Splunk Lantern

Running Edge Processor in containers


In a prior article we covered how and when to scale Edge Processor nodes. Now let’s take a look at using containers to provision additional Edge Processor nodes. Using containers and container architectures alleviates a great deal of the technical and administrative work found in typical infrastructure scale-out.

As this series is focused on Kubernetes generally and Amazon EKS specifically, we’re going to build and use Docker images throughout. While it’s important to understand that the Splunk platform does not manage or release any Docker images for Edge Processor, we can still easily build our own image.

Onboarding new Edge Processor node

First let’s examine the node onboarding process to better understand the requirements for building compatible containers. As always, refer to the documentation for the most up to date end-to-end process of adding new nodes, but let’s take a granular look at the process.

In order to scale out, you need one or more Linux servers provisioned and ready to use. Then, on each of these additional servers, the process for bootstrapping the node is essentially just running a script. That script is what we’ll take a look at now.

Open up an Edge Processor in your browser and look at the script in the “install/uninstall” section of the Manage instances screen.

1.png

Let’s break down the script. Remember, this is run on every server in order to get a node up and running.

  1. First it gets the most recent version of the splunk-edge bootstrapping binary:
    curl "https://beam.scs.splunk.com/splunk-edge/v0.0.198-689fac1f-20221119t005809/linux/splunk-edge.tar.gz" -O
  2. Then it checks to make sure the package matches a checksum:
    export SPLUNK_EDGE_PACKAGE_CHECKSUM=$(echo "$(sha512sum splunk-edge.tar.gz)" | cut -d " " -f 1)
    if [[ "$SPLUNK_EDGE_PACKAGE_CHECKSUM" != "627af0176786945270fb66496e330f28004256a329ccd48c449c262613e2fd081a67c6579bfea3f08df75bac043d8feffe0500dab60ebd0a27fc6cbb06ba7b5e" ]]; \
    then \
    echo "The installation package is invalid. The download did not complete as expected. Try downloading the package again."; \
    else \
    tar -xvzf splunk-edge.tar.gz
  3. Next it sets up some initial configuration files that tell the edge package details about the environment for which it’s being provisioned:
    echo "groupId: d81d22ae-be3f-4ccf-d3ad-4afaac7081bd" > 
    ./splunk-edge/etc/config.yaml
    echo "tenant: my-tenant" >> ./splunk-edge/etc/config.yaml
    echo "env: production" >> ./splunk-edge/etc/config.yaml
    echo "eyJhbGciOiJS………" > splunk-edge/var/token
  4. Finally, the Edge Processor binary runs:
    mkdir -p ./splunk-edge/var/log
    nohup ./splunk-edge/bin/splunk-edge run >> 
    ./splunk-edge/var/log/install-splunk-edge.out 2>&1 </dev/null &
    fi

It’s important to understand that the splunk-edge process is responsible for bootstrapping and overseeing a distinct Edge Processor runtime process. As the Edge Processor runtime is updated frequently and is managed independently from the bootstrapping, it can’t be packaged, installed, or managed in another way. This splunk-edge process has to run first on each Edge Processor node. Now, let’s look at the key components of this script:

  • groupId: d81d22ae-be3f-4ccf-d3ad-4afaac7081bd

    groupId is the unique identifier of the Edge Processor this node is going to be associated with. You can see this identifier very easily by opening up an Edge Processor in the UI.
    3.png
  • "tenant: my-tenant"

    Tenant is the name of your Splunk Cloud Platform tenant
  • "env: production"

    Env is always production.
  • "eyJhbGciOiJS………" > splunk-edge/var/token

    The token listed in the file is your current Splunk Cloud Platform API token. As we learned in the prior article, this token expires and we have some tools to retrieve a valid token for automation. You can also always retrieve a current token at: https://console.scs.splunk.com/<your-tenant>/settings.
  • nohup ./splunk-edge/bin/splunk-edge run >>
    ./splunk-edge/var/log/install-splunk-edge.out

    And finally we see that the splunk-edge binary is run in a silent and persistent way. This particular invocation of the binary isn’t service or container friendly, but at this point the key is to understand that after the variables and configurations are in place, running splunk-edge runs the rest of the process.

Offboarding an existing Edge Processor node

Now that we understand the process involved in starting a new node, let’s take a quick look at removing a node by reviewing the commands in the Uninstall screen of the Manage instances page from before.

SPLUNK_EDGE_PID=$(pidof splunk-edge)
SPLUNK_EDGE_DIRECTORY=$(pwdx $SPLUNK_EDGE_PID | awk '{print $2}')
cd $SPLUNK_EDGE_DIRECTORY
kill $SPLUNK_EDGE_PID && ./splunk-edge/bin/splunk-edge offboard && rm -rf ./splunk-edge

This set of commands is meant to simply end the splunk-edge process on a node and issue the offboard command.

This offboard command is critical to maintaining a known-good list of instances in the UI. If you decommission instances without offboarding them, your UI will be left with orphaned instances as seen here:


2.png

Building a generic Edge Processor node container

As we saw above, we can’t bake the binaries and configuration settings into the container since we need to bootstrap to the latest edge binary and provide configuration variables. In order to start the containers in a way where we get the most recent binaries and to provide a generic container to be used with specific Edge Processor group configurations, we’ll use a long running entrypoint script pattern for building and running our container.

If you’ve never worked with Docker or building containers before, there are good resources online to come up to speed.

Here are the steps to build our container:

First we need a clean directory to work in on a Linux server. This directory will hold the Dockerfile that defines our container, as well as some supplemental files that will be covered later. The naming isn’t important here. 4.png
Create a file called Dockerfile and include the content to the right. It’s not necessary to use Ubuntu. Any supported OS can be used. Additionally, note that curl is installed because it’s used in the entrypoint script to download the Edge Processor bootstrap file. You can replace curl and the script reference to curl with whatever binary you would like to download the file.
FROM ubuntu:20.04
ENV DEBIAN_FRONTEND=noninteractive
COPY entrypoint.sh /entrypoint.sh
COPY auth /auth
RUN chmod +x /entrypoint.sh
RUN apt-get update && apt-get install -y curl && rm -rf /var/lib/apt/lists/*
ENTRYPOINT ["/entrypoint.sh"]
Download the entrypoint script here and place it in the directory. 6.png
In the prior article, we covered the prerequisites and process of token authentication and you will have received access to some executables for that process. Place the auth binary in this directory as well. 5.png

With those files in place, we can build our Docker image, which creates the image locally. We can use that for testing.

docker build -t edgeprocessor .

8.png

Running and testing the container

Now that we have a container we can run it locally to test that it is working. Upon examination of the entrypoint script, we can see that it works using the following environment variables, which should look familiar from above.

$GROUP_ID The Edge Processor group id for the node
$SCS_TENANT Your cloud tenant name
$SCS_ENV Always “production”
$SCS_SP The service principal from the authentication bootstrapping process (See prior article)
$SCS_PK The private key from the authentication bootstrapping process (See prior article)

You can now run the container locally to test the behavior.

docker run \
-e GROUP_ID=<your edge processor group id> \
-e SCS_TENANT=<your scs tenant name> \
-e SCS_ENV=production \
-e SCS_SP=<your principal service principal> \
-e SCS_PK=<your principal private key>  \
edgeprocessor

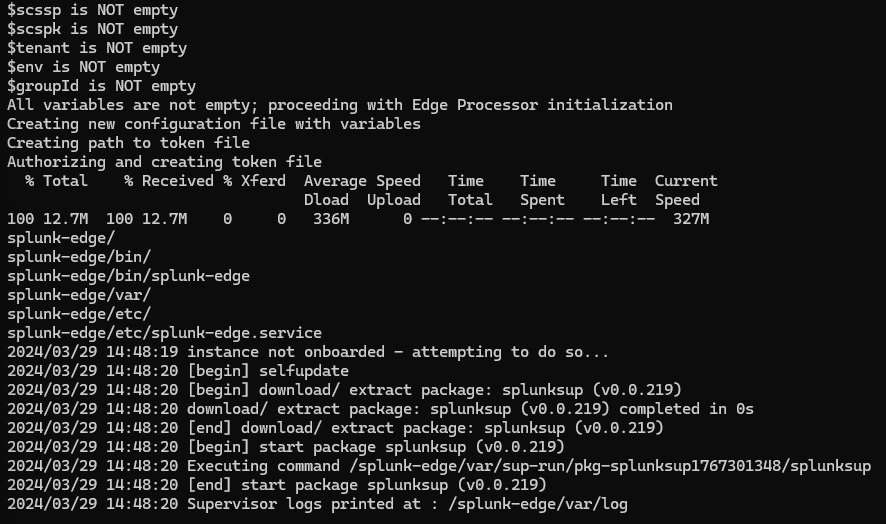
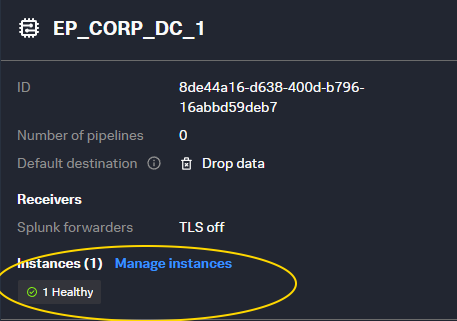
Your terminal will output status information indicating the container logs, and your Edge Processor console will show your new instance.
Terminal Window 7.png
Edge Processor Console 9.png

Cleanup after testing

After we see that the container is able to run and the node properly registers for the Edge Processor, you can terminate that testing docker container. It’s important to properly terminate the container so that the offboard command from the entrypoint script runs; otherwise, you will end up with an orphaned instance.

Get the container ID of your running container.

docker ps
CONTAINER ID  IMAGE                           COMMAND     CREATED        STATUS            PORTS       NAMES
4731ae03b665  localhost/edgeprocessor:latest              8 seconds ago  Up 9 seconds ago              adoring_franklin

Issue a terminate command to that container.

docker exec 4731ae03b665 sh -c 'kill $(pidof splunk-edge)'

Closing notes

  • Troubleshooting containers and this process is out of the scope of this article, and troubleshooting containers in general can be a laborious task. All of the tools provided in this article have debug flags and can be run manually from within the container.
  • The Splunk Cloud Platform service principal private key is a JSON payload. You almost always have to wrap the JSON in single quotes (‘) when working with it in the terminal or in environment variables. This is the most common mistake in this process.
  • The container image we created is only stored locally on the server we’re using to build the container. For use in an enterprise environment such as EKS, OpenShift, Rancher, or others you will need to push this image into a repository that can be referenced within your deployment manifests.

Next steps

Now that we have a good working container and can pass in the proper configuration variables, we can start building our Kubernetes configurations to support a scalable deployment.

  • Written by Nick Zambo and Ben Ferguson
  • Splunk and Principal